21 Integrating commits
Integrating Your Commits with Your Team’s Commits
21.1 Introduction
In the team study activity, Syncing with your Team Repository, we practised how to synchronise your local repository with your team’s when someone in your team had pushed work to the remote since you last synchronised. In this follow on self-study document, we’ll cover the procedure we recommend you to follow when you have work on your local master branch that you need to integrate with work at the team remote. It covers more complex cases than the team study activity. but ones which are very common when working on a collaborative coding project using Git.
Note that this document is an explanation of various Git concepts, using a running example based on the example used in chapter 15 Syncing with your Team Repository. You won’t be able to follow along with these exact steps on your own project, but you’ll be able to use the concepts and ideas we describe in your own work afterwards.
21.2 Git has Rejected my Push
Suppose you and a team mate have both made commits on your local master branches, from the starting commit of the project. You worked on a feature branch, and merged it into the development branch (using a fast-forward merge) so your local history looks like figure 21.1.

Figure 21.1: Your local history
Your team mate made a single commit directly onto the development branch and pushed their work to the team repository, so that the remote commit graph looks like figure 21.2.
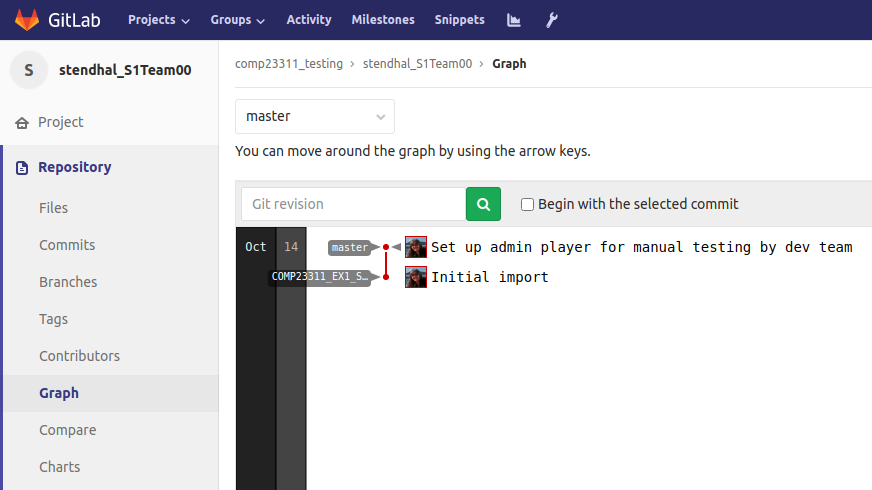
Figure 21.2: Your remote commit graph
When you push your work, Git rejects the attempt, shown in figure 21.3.
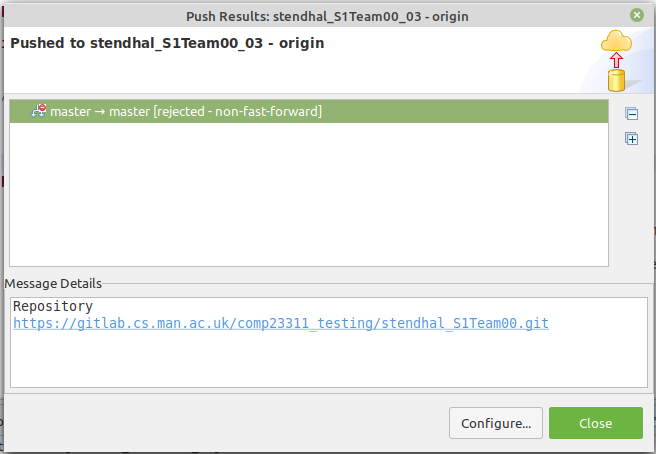
Figure 21.3: Can you see why git has rejected this push?
Can you see why?
When you push your development branch to the remote, Git has to try to work out how to combine these two graphs. The only commit that both graphs have in common is the starting commit (96e7b2f), so that will appear once in the combined graph, with two lines of commits extending from it—the line leading to your local master branch and the line leading to your team mate’s master branch, at its position when it was last pushed to the team’s remote repository.
Combining these commit graphs is easy and Git can do it for us automatically. The problem comes when Git tries to work out the position of master branch in the combined commit graph. Git needs to reconcile the current position of master (at commit 012f3c3f) with the new position you are suggesting for it (commit 48b498b). It tries to do this using a fast-forward merge, and if that isn’t possible it will reject the attempt. In this case, there is no path through the combined graph linking the two master branch positions that does not involve going backwards in time. Therefore, a fast-forward merge is not possible, and Git rejects the push.
When Git rejects a push, it means that we need to synchronise the state of our local repository with the team repository. Then we can push again (and hopefully be successful—provided no work has been pushed to the repository in the meantime).
As before, synchronisation follows two steps:
- Fetch down the new commits from the remote repository.
- Integrate your existing commits with the new commits.
21.2.1 Fetching the New Commits from the Remote
This step is straightforward. Just right click on the project name in the Package Explorer view, and select Team > Fetch from origin. Your local commit graph now looks like figure 21.4

Figure 21.4: Your local commit graph
We can see from this why a fast-forward merge of the remote tracking branch for master into our local master branch was not possible.
The next step is to integrate the work we pulled down from the team remote with our own, so that the result can be pushed to the remote and be visible to other team members.
Git provides two mechanisms for integrating separate lines of development work: merge and rebase. They are both useful, but have different strengths and weaknesses. Different workflows recommend they be used in different ways. For example, GitFlow mandates the use of non-fast-forward merges, even in situations where fast-forward merges are allowed, while Cactus Flow requires the use of rebase for all code integration events. Other workflows mix merge and rebase, as we do in the simple Feature Branches workflow we ask you to use in this course unit.
In the situation we are looking at now, synchronising your work with the work of your team, we recommend that you use rebase rather than merge. In the remainder of this document, we’ll look at both strategies, and explain why we make this recommendation.
21.3 Integrating the New Commits using Merge
The Git merge operation takes two branches, one pointing to the line of development that needs to be extended with the new changes (the target branch), and the other pointing to the line of development containing the new changes that need to be integrated (the source branch). There are three possible options for any merge:
- The changes are already on the target branch (because the source and target both point to the same commit, or because the source branch points to a commit that is an ancestor of commits on the target branch). In this case, the merge succeeds without Git having to do anything.
- The changes are on the same line of development as the target branch, but ahead of it. The target branch just needs to be moved forward along the line of commits, to reach the same point as the source branch. This is the fast-forward merge case.
- In all other cases, we need to create a new merge commit, with two parent commits, the source branch and the target branch. The target branch is moved forward so that it points to the new merge commit, and so includes the commits in the source branch as well as all the commits it pointed to before. This is the non-fast-forward merge case.
Looking at our example and the combined graph after the Fetch operation, we can see that the 3rd of these cases applies.
To make the merge commit, first make sure that you have checked out the branch you want to integrate the new commit into. In this case, this is our local master branch. We can see from the History view contents that it is already checked out.
Right click on the commit pointed to by the branch we want to integrate from: in this case, the commit pointed to by branch origin/master. Select Merge.
This succeeds, and produces the summary shown in figure 21.5
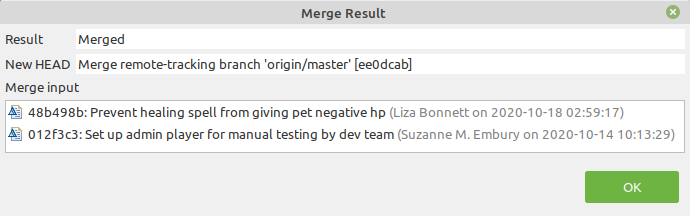
Figure 21.5: Merge result dialog box indicating success
This tells us that the merge was not a fast-forward merge, that the checked out branch (HEAD) has been moved forward to point to the new merge commit, and reminds us of which commits were merged by this operation. The History view shown in figure 21.6 us the new local commit graph after this operation has completed:
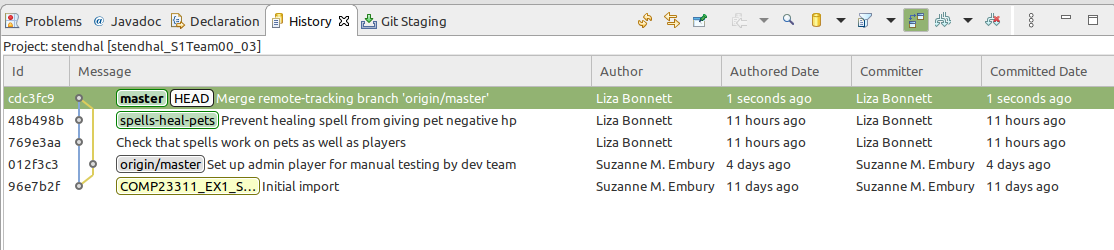
Figure 21.6: The History view shows us the new local commit graph
Here you can clearly see the new merge commit, with its two parent links. The code base it represents contains the changes made by us (the fix of the healing spell bug) and the changes made and pushed by our team mate (the addition of an admin player to the admins.txt file.
Notice that only the checked out branch (master) changed its position as a result of this operation. Our feature branch and the remote tracking branch for master both remain as they were before we made the merge.
If you compare our new local commit graph with the graph at the remote (still as it was at the start of the scenario) shown in figure 21.7, you’ll see that Git can now perform a fast-forward merge of the new commits on our local master branch with master branch at the remote.
Figure 21.7: New local commit graph with the graph at the remote, still as it was at the start of the scenario
So now, we can push our work, and the push should succeed.
The remote repository now contains our commits, integrated with our team mates’ commits, on master.
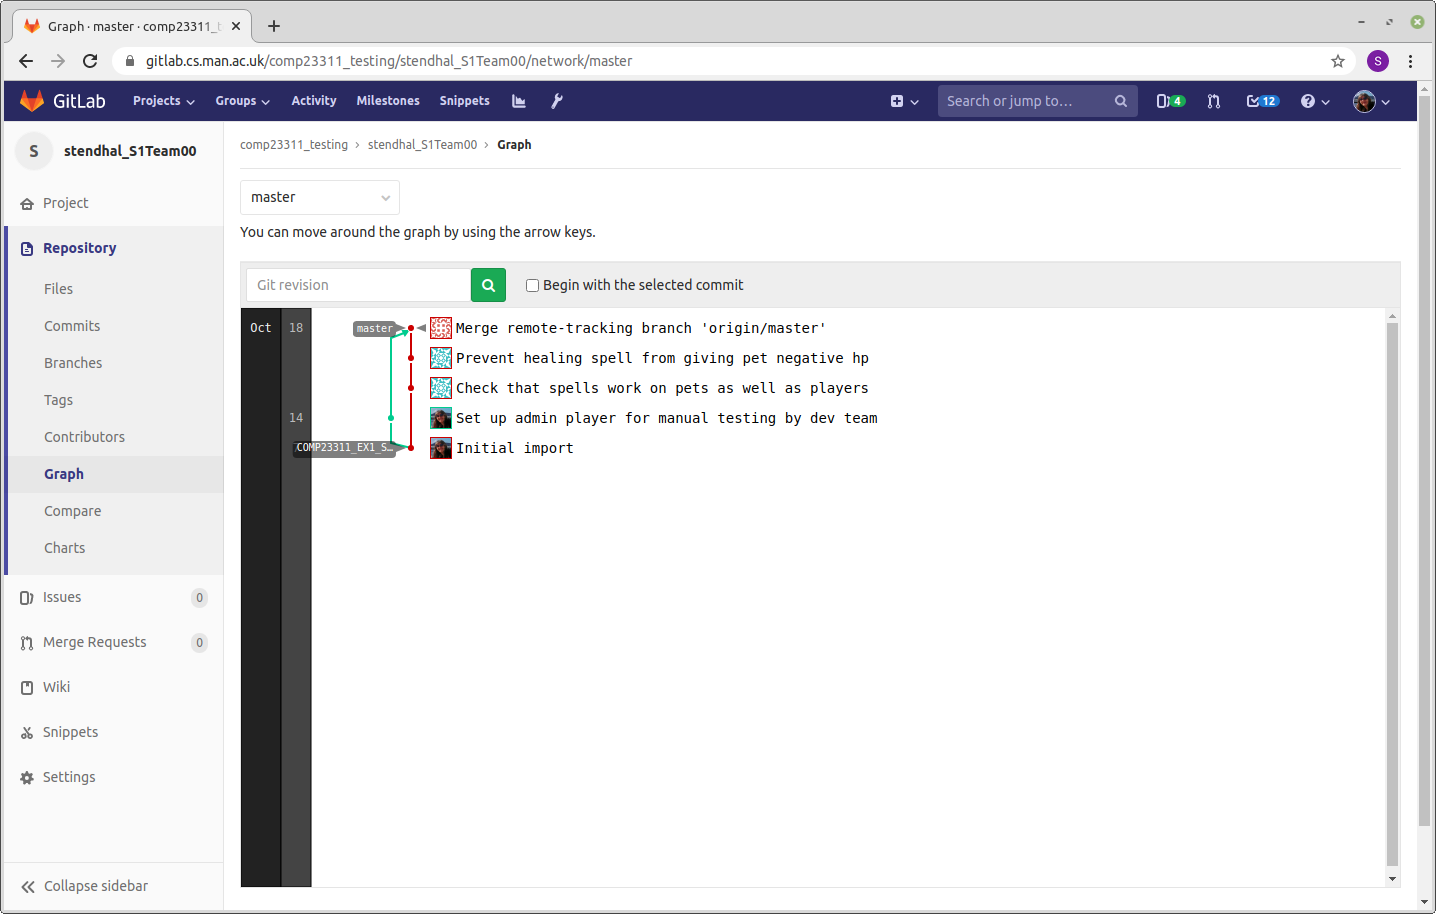
Figure 21.8: The remote repository now contains our commits
(Note that we didn’t push our feature branch, so it is not visible on GitLab ((gitlab.cs.man.ac.uk)[https://gitlab.cs.man.ac.uk/], even though the commits that were made on it are now present in the team remote. Git keeps a clear distinction between commits and branches. If you push a branch, you also push the commits it is pointing to, but you don’t automatically push all branches or tags that are pointing to those commits.)
In our local repository, Git has updated the position of the remote tracking branch, origin/master, to reflect the change in position of the branch in the remote.

Figure 21.9: Git has updated the position of the remote tracking branch
Merge in Git is a great tool when we want to integrate feature branches into our development branch, or hotfix branches into our release branch, or any situation where a line of development has reached a stable state and needs to be integrated with the next line of development in the pipeline leading to released code.
But, it is not a great tool to use for synchronising our work with our team’s. This is because it creates unnecessary merge commits and branching structures in our code history that don’t reflect key points of code integration, but simply reflect that we decided to synchronise our code at that time. This isn’t information that we need to keep for future readers of the code base. It complicates our code history, making it look less linear and clean than it should. And anything that makes our code base harder to read is an added cost that we should avoid if we can.
Using the second technique for code integration, Git rebase, avoids this problematic cluttering of the code history. It requires a little more effort on the developer’s part, but soon becomes second nature. We’ll now explain how to carry out the same synchronisation task just discussed, but using rebase instead of merge.
The Git Pull Command
You may be wondering why we have not so far mentioned the Git pull command, which is commonly talked about as being the way to quickly sync up with your remote repository.
Git pull (in its vanilla form) is just syntactic sugar for the execution of two other Git commands: git fetch followed by git merge. It’s a handy shortcut for whenever you want to use the merge approach to synchronising your code, but also therefore shares all the same limitations of using merge for synchronisation. Whenever you execute git pull you may be creating a new merge commit in your code history.
It is possible to configure the pull command to work differently (using rebase instead of merge, for example). For this course unit, and especially for students who are new to collaborative coding using Git, we recommend that you avoid the use of the pull command, and instead carry out the two steps separately for yourself. This does not require many more mouse clicks, and allows you to see what is happening at each stage, and adjust your next steps accordingly. It also means you gain a much more solid understanding of what Git is actually doing, rather than just issuing a pull command and hoping for the best.
21.4 Integrating the New Commits using Rebase
Let’s go back in time, to the point at which we started to integrate the commits we had fetched down from the remote. (Luckily, we are using Git, which is a tool for going back in time very easily.) Our local commit graph looks like figure 21.10
Figure 21.10: Our local commit graph
And our team remote looks like figure 21.11.
Figure 21.11: Our team remote graph
This time, we’re going to use rebase to perform the synchronisation. When we rebase branch A onto branch B, we are asking Git to replay the commits that are unique to branch A on the top of branch B, as though we had made the same changes with B checked out as we did formerly with branch A checked out.
For example, let’s look at a simple commit made by the Stendhal development team to prepare one of the 2019 releases shown in figure 21.12
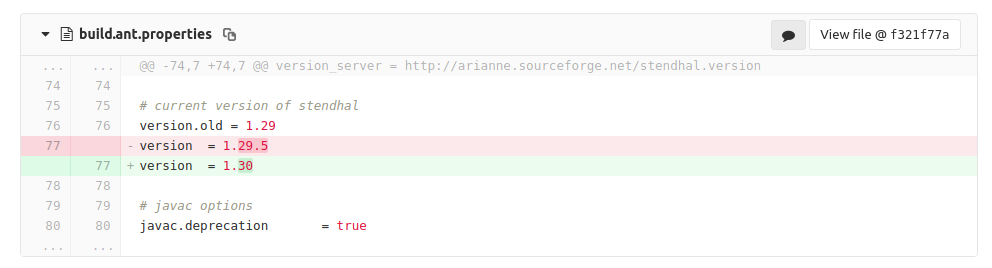
Figure 21.12: A simple commit made by the Stendhal development team
This shows the change introduced by the commit. The red coloured lines (starting with -) are lines that have been deleted, and the green coloured lines (starting with +) are lines that have been added in the commit. Git stores the 3 lines before the change and the three lines after the change, to allow it to work out where the change should be applied. (Line numbers are also shown, but can’t be relied upon entirely - if lines are added or removed to the part of the file before this, then the line numbers will be completely inaccurate.)
Although this change was made to a specific version of the code, the same change can be made to any version that includes this file, in a version that contains the lines that are modified by the commit and the preceding and following lines that identify them. In other words, the commit can be taken and replayed in some other part of the commit graph. Provided the affected parts of the files are the same, the commit makes just as much sense when replayed as it does when originally applied. This is rebasing.
We can use this notion to integrate our work, with the work of the team. Before we show how to use rebase in the case of our merged feature branch, we’ll first illustrate the idea through some simpler scenarios.
21.4.1 Rebasing Commits Made on the Master Branch
Imagine we have made some commits directly to our master branch and need to synchronise these with a commit to master made by a team mate and pushed to the team remote. Our local commit graph looks like figure 21.13.

Figure 21.13: Our local commit graph
We can create a linear code history suitable for fast-forward merging by rebasing our two commits on top of the commit from our team mate. To do this, we make sure we have our local master branch checked out. Then we right click on the commit we want to rebase onto (commit 012f3c3) and select Rebase HEAD on from the menu that appears.
This produces a commit graph shown in figure 21.14

Figure 21.14: A commit graph, note the changes carefully
Look carefully at what happened here. It almost looks as though the two commits on master were moved across to the origin/master branch. In fact, they are brand new commits; you will see that they have different SHA identifiers. The change made to the code is the same, as are the commit message and the author details. But the committer details have changed to show a different committed date. And the committer could potentially have changed, if the person doing the rebase wasn’t the same as the person making the commits in the first place.
The local master branch has now moved to point to the latest of the new (rebased) commits. The old commits are still present in the repository, but since they are now not reachable from any branch or tag, Git does not show them.
Since master is now ahead of its position in the remote repository, we’ll be able to push it to the team repository. The origin/master branch will be moved forward to the tip of master as a result of the push. When a local branch is at the same location as its remote tracking branch, then we know that the repositories are in sync (at least as far as those branches go).
21.4.2 Rebasing to Sync Repositories When Working on a Feature Branch
Let’s now consider a scenario where we are working on a feature branch. We created the feature branch at the initial commit, and have made a couple of commits on it but have not yet finished working on it. At the start of our working day, we want to synchonise our repository with the team’s, so that we don’t diverge too far away from the work the rest of our team is doing. After we’ve fetched in the commits from the remote, our local graph looks like figure 21.15.

Figure 21.15: Our local graph after we’ve fetched in the commits from the remote
If we’d started work on this feature branch after our team mate had pushed their commit to the remote, we’d be able to synchronise easily. Our feature branch would have begun at commit 012f3c3, where our local master branch would be. We’d be able to push the code to the remote straightaway, as all integration would be with fast forward merges.
We can use rebase to get our code base into this state.
First, we synchronise the position of our local master branch with the origin/master branch. To do this, we check out master then right click on the commit that origin/master is pointing to (commit 012f3c3) and select Rebase HEAD on. The result looks like figure 21.16.

Figure 21.16: updated commit graph
Notice how we appeared to have performed a fast-forward merge of master into origin/master? There is no difference between the commit graphs that result from a fast-forward merge and from a rebase, in this case.
Next, we need to replay our feature branch commits on top of master. Check out the feature branch, then right click on the commit where the two master branches are located and select Rebase on HEAD. The commit graph will now look like figure 21.17:

Figure 21.17: New commit graph
As can be seen, we now have a synchronised (and tidy!) commit history. The local master branch is at the same location as its remote tracking branch (for now) and the feature branch is based on the latest version of the code. We can now push either master or the feature branch successfully, and can continue work on the feature branch knowing we are building on a recent version of the code.
Only Rebase Local History, Not Shared Public History
Rebase is a little riskier than using merge. Merge leaves the whole history intact, only adding a merge commit to it, so there is no risk of losing any commits. But rebase rewrites the history of the code changes, potentially in quite radical ways. Information, and in some cases even commits, can be lost.
While it is no problem to rewrite the code history in your local repository, it’s vitally important that you don’t attempt to change the history of your team’s remote. That is confusing and disruptive for everyone on the team, and runs a significant risk of losing commits—not your own commits, but the commits of your colleagues. They will not be pleased… So when using rebase it’s important to keep in mind which commits in your local commit graph also exist in your team’s remote and which commits are just local to your own code history. Commits in the former category should not be rebased. Commits in the latter category can be.
21.4.3 Rebasing to Sync Repositories After a Fast-Forward Merge
We can now finally return to the scenario we started this document with. As a reminder, in our local repository, we had just merged a feature branch with our local master branch, and then discovered that new commits had appeared on the remote master when we synchronised before attempting to push:
Figure 21.18: A reminder of the commit graph
This scenario gives an example of how rebase requires a little extra thought before using it. We need first to decide what we want the code history to look like, and then we can use rebase to make that happen.
In this case, we need to decide what we want the history of the merged feature branch to look like. If we had remembered to fetch and sync before starting work on the feature branch, we would have ended up with a fast-forward merge of the branch on master, with its parent at origin/master. So, let’s make the history look like that’s what happened.
To achieve this history, we first reset the local master branch to point to origin/master—the commit it would have been on, if we had remembered to sync before creating the feature branch. Check out master, then right click on the origin/master commit and select Reset > Hard.

Figure 21.19: local commit graph after reset
Then we rebase the feature branch on top of master. We first check out the feature branch, and then right click on the master branch commit, and select Rebase HEAD on. This results in the graph shown in figure 21.20

Figure 21.20: Resulting commit graph after feature branch rebasing
Now we have reorganised the history to the point where we are ready to merge the feature branch into our development branch. This is a feature branch integration step, so we should strictly speaking use Git merge. But since it will be a fast forward merge, there is no difference in terms of the commit graph outcome between using merge and rebase in this case.

Figure 21.21: Reorganised history
The repository is now ready to push. Since master is ahead of origin/master on the same line of development, Git will have no problem in making the fast-forward merge needed to allow it to accept the push shown in figure 21.22
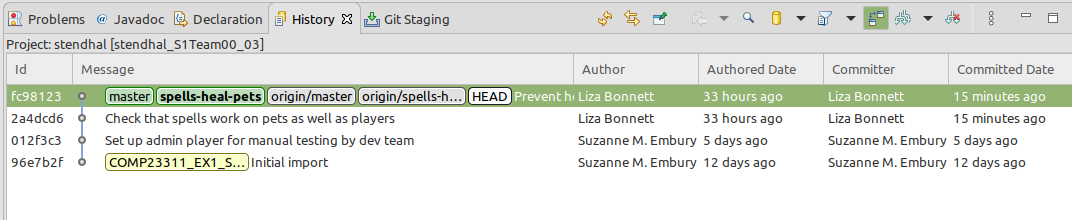
Figure 21.22: local commit graph after push
And our code history on GitLab looks pleasantly clear and linear as in figure 21.23.
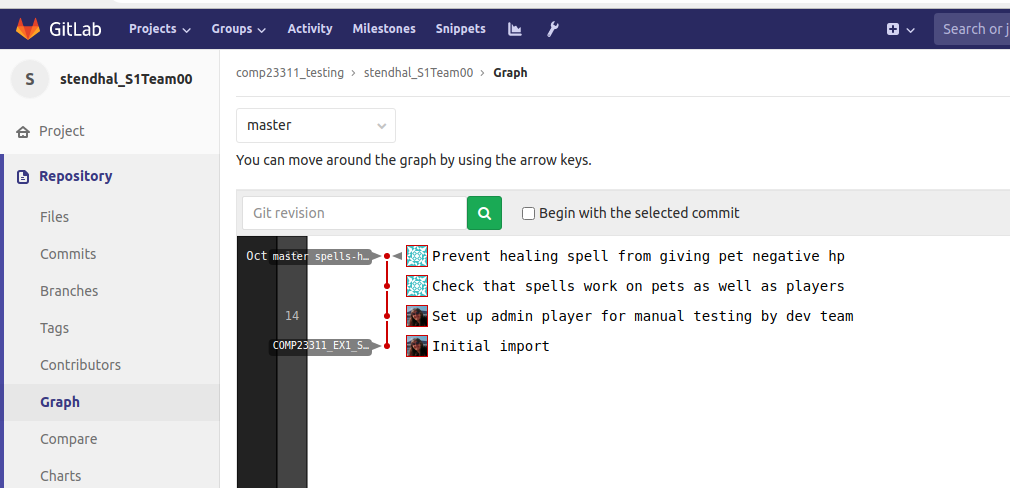
Figure 21.23: Our code history on GitLab is pleasantly clear and linear
Force Push
Because rebase changes the code history, it is easy to get into a situation where your local history differs from the remote history in ways that mean Git refuses to push your work. This can be stressful (especially if close to a looming deadline) but you need to resist the temptation to use force push. This almost always leads to loss of your colleague’s commits and can be very disruptive for your team.
Instead, you need to get your repository into a state where it can be pushed, without requiring the --force flag. As long as you stick to the rule of not changing commits that also exist in your team remote, all should be well. Though it is always worth leaving yourself enough time before the deadline to get help from your team mates or from the course team if things do go wrong.
21.5 A Final Word
In this document, we took you through several different approaches to synchronising your local repository with your team remote, after your team mates have made changes. In this course unit, we ask you to use:
- Git Merge for integrating finished feature branches into your development branch, and
- Git Rebase for synchronising your repository with your team remote.
This allows you to practice both styles of code integration in the single project, while also keep to a fairly simple and well-used workflow (based on feature branches).
This is by no means the only workflow you could use, and we certainly don’t claim it as the best in all circumstances. But it is an approach that allows you to gain the core Git skills that will enable you to use any workflow that you may be called up on to comply with in future projects.
One major omission from this document is any discussion of what happens when we encounter conflicts while integrating code or synchronising our repository. We’ve chosen the issues for exercise 1 to try to avoid conflicts, but you will definitely encounter them in the second team coursework exercise, when you start to work on larger features in sub-teams. We’ll cover handling conflicts in another learning resource for the unit.
Good luck!