17 Individual Coursework 2
Exercise 2: Test-First Development and Managing Conflicts in Git
17.1 Introduction
This second individual coursework exercise for COMP23311 is designed to help you develop two new skills that professional software engineers need, and that will be essential for the second team coursework exercise:
- Test-first development, and
- Handling conflicts during integration of separate lines of development with Git.
Test-first development (TFD) is an approach to developing software in which we first write the test cases describing the functionality we need to implement, and then write the production code that will cause them to change from failing tests to passing tests. The tests provide the specification for what needs to be built. You are getting a taste of TFD in writing the tests to make your bugs visible in the first team coursework exercise, but you’ll be required to apply it more extensively in the second team coursework exercise. This individual coursework exercise gives you a chance to practice the basic skills in private, before you have to use them in front of your team and industry mentor. It does this by giving you a set of test cases describing the behaviour needed of a new feature for the Sliding Puzzle game you worked on in the first individual coursework exercise. Your task is to make these failing tests pass, by implementing the feature as the tests (and the issue text) describe it.
When you’ve implemented the feature, you’ll need to integrate it with your development branch (in this repository, the main branch). But, another member of the Sliding Puzzle team has also made commits on the development branch since work on your feature began, implementing another feature. You’ll need to merge the two lines of development together. Since both features touch much the same parts of the code, a number of conflicts will be discovered when you try to merge. Your task is to remove the conflicts from the code base, so that the merge can go ahead. You’ll finish by creating a commit that contains both new features, co-existing together, and passing both sets of tests.
You’ll practice these skills by carrying out the following steps:
- Clone the coursework repository and import it into your IDE.
- Read the tests describing the new feature you must implement, on the feature branch provided.
- Make changes to the production code, to implement the feature and cause the tests to pass.
- Commit the code to the feature branch.
- Merge your branch with the development branch.
- Deal with the conflicts that the attempt to merge makes visible, and complete the merge.
- Push the completed merge to your remote repository for marking.
- Update the issue tracker to record the project status, and request marking.
Instructions for carrying these tasks out from within the Eclipse IDE are given in this document. We focus on Eclipse as that is the IDE used for the team coursework. You are free to use any IDE to carry out this individual coursework exercise, but we can currently only provide instructions and technical support for Eclipse, run on Linux on the machines in labs in the Kilburn building.
Once the exercise is completed, you should be ready to use the same skills on your team’s repository in the remaining team coursework exercises.
ℹ️ Note ℹ️
Trouble-shooting If you experience problems when completing this exercise, you can find a trouble-shooting guide on the School’s wiki at:
wiki.cs.manchester.ac.uk/index.php/LabHelp:Main_Page
We’ve provided two indexes into the trouble shooter, to help you find your way around. One is an index of error messages:
wiki.cs.manchester.ac.uk/index.php/LabHelp:Errors
If a specific error message is being reported alongside the problem you are experiencing, then you can look for it in this index, and find suggested solutions that have worked for students with this problem in the past.
The second index contains descriptions of more general symptoms:
wiki.cs.manchester.ac.uk/index.php/LabHelp:Symptoms
Use this index when something is going wrong but you do not have any specific error message to help you track down the cause of the problem.
Please report any problems you encounter that are not covered in the troubleshooter as soon as possible, including full details of specific error messages and screenshots where appropriate. You can report problems on the course unit piazza forum at piazza.com/class/lm0s5lzly5q41i, or by e-mail to the course team. We’ll do our best to help!
17.2 About the Coursework
17.2.1 Key Information
The exercise will be marked out of 10, and will count towards 7% of your total mark for the course unit.
The deadline for submitting the exercise is: 6.00pm, Friday 20th October 2023
You’ll submit your work through a GitLab repository that will be created for you when the exercise begins. Once created, this should be visible in your personal project list through the GitLab web interface at:
At the deadline, for everyone who has submitted their work, we’ll remove your developer-level access to the repository so that you cannot make any further commits or changes to the code base make a clone of your repository. You should make sure you have pushed your Git branches and commits to your GitLab repository by then, and make a comment in your issue tracker to let us know the work is ready to mark. There are no additional submission steps.
Your work will then be scheduled for marking in the next batch. Marking the work normally takes 2-3 working days, followed by a period for manual checking of a sample of solutions.
Feedback on your work will be uploaded to the issue tracker of the GitLab project, once the marking process is completed.
17.2.2 Marking Scheme
This coursework exercise consists of 8 steps. If you complete them all correctly, then you should earn full marks against the marking scheme shown in table 17.1. But note that we can only mark work that is present in your GitLab repository, and the earlier steps involve doing work in your local Git repository. We won’t be able to see that work until you get to the final step, and push your commits and branches to your GitLab repository. If you reach the deadline with some of the steps incomplete, and want us to mark what work you have done, you’ll need to jump forward to step 7 and complete as much of it as you can before the deadline to allow this.
| Criterion | Marks |
|---|---|
The move-counter branch passes the tests supplied in commit 7f9bff8b. |
2 |
The main branch passes the tests supplied in both feature branches (commits 7f9bff8b and 2a3a0934). |
2 |
The main branch is located at a merge commit, with one parent being commit 2a3a0934 (pointed to by the game-timer branch) and the other parent being the commit pointed to by the move-counter branch at the time the merge is made. |
1 |
| No other merge commits appear in the commit graph. | 1 |
The code version represented by the commit on the move-counter branch contains conflicting code elements when compared with the code at the original location of the main branch (commit 2a3a0934) |
2 |
No conflict markers exist in the merged code. (If the move-counter branch has not been merged with main in the submitted repository, the mark for this criterion will be 0.) |
2 |
| Penalty: changes to files that are not part of the source of the solution (such as class files or test result files) have been committed. | -2 |
| Total | 10 |
⚠️ Caution ⚠️
Note that the coursework must be carried out without the use of merge requests - to ensure this, we have disabled the merge request facility on your coursework repository. The point of the exercise is to carry out these operations for yourself, in your local repository, and to gain an understanding of exactly what Git is doing when tools such as pull/merge requests are used. It is important to learn how to use merge requests correctly (as a code quality tool) and not to use them as a short-cut for making merge commits. You’ll get practice at working with them in the later team coursework, but need to demonstrate your ability to merge without them first.
17.2.3 Pre-Deadline Feedback
To give you a chance to check your work and make corrections in advance of the deadline, we will run the automated marking code on all student repositories shortly after:
6.00pm, Friday 13th October 2023
This will add provisional feedback and a provisional mark to the issue tracker for your repository, covering the part of the work you have completed and pushed to GitLab by that date. You will then have until the deadline to make corrections. The automated marking code will mark only your latest commits, and will ignore earlier incorrect commits or merge attempts. This means you can commit fixes to your feature branch and attempt the merge again, to try to catch up on any marks you may have missed in your first attempt.
All repositories where any changes have been made by students by the deadline will be provisionally marked. You don’t need to request it.
We guarantee to provide provisional marks for everyone who has started the work by the provisional marking deadline. Students who start the work after this may receive some provisional marking or they may not, depending on whether their repository is processed by the marking code in time.
17.2.4 Submission Procedure
To submit your work for final marking, you must add a comment to the coursework issue in the issue tracker of your project, saying:
If this comment is not present on the coursework issue, we will assume that you are not ready to submit the work.
You may delete and re-add the comment as many times as you like up until the formal deadline for the coursework. Once your work has been marked, we will ignore any further changes to your issue tracker; it will not be possible to request marking for a second time once marking for your project is complete and the feedback has been uploaded to your issue tracker.
The time of submission will be the time at which this comment was last added to the repository. This means you should only add it once all other activity required for the coursework (pushing of commits, etc) is finished. Any changes to your repository made after the final eligible marking request has been made will be ignored by the marking process. So make sure you have definitely finished all your work, before you add the comment, especially if you are submitting after the deadline.
After the deadline or after you have added the request for marking comment to the issue if you submit late), your development access to the repository will be removed, to preserve the state of the repository for marking. At this point, you will not be able to see some parts of your submission, due to your restricted role on the project. This is nothing to worry about - the work is still there, it is just not visible to you.
17.2.5 Late Submissions
This coursework follows the University’s standard policy on marking work that has been submitted late.
A penalty of 1 mark will be applied for each 24 hour period following the deadline that the work is late, up a total of 9 such periods. Note that for the purposes of this calculation, weekends and evenings are counted. This means that, since this coursework’s deadline is on a Friday, a submission on Monday morning will receive a penalty of 3 marks.
These penalties will be applied until all marks earned by the student have been removed. Marks will not go below zero.
Work which is submitted more than 10 calendar days after the deadline will be considered a non-submission and will be given an automatic mark of 0. It is at the discretion of the course leader and the Department as to whether the work is marked sufficiently for feedback to be provided.
For this coursework, the submission time will be the date and time at which you place the comment saying the work is ready for marking on the issue for the exercise. All work that has been pushed to GitLab by that date will be marked. Any commits or references that are not pushed to GitLab until after marking is requested will not be considered during marking, even if they were created or modified in your local Git repository before this.
17.2.6 Plagiarism
This coursework is subject to the University’s standard policy on plagiarism:
wiki.cs.manchester.ac.uk/index.php/UGHandbook19:Academic_Malpractice
17.2.7 How to Get Help
Help with this exercise will be available in the team study sessions (when your team is not being marked). Sign up on the live help queue gitlab.cs.man.ac.uk/comp23311_2023/COMP23311-Live-Help-Queue during the sessions, using the Individual Coursework Ex 2 label and issue template. A member of staff or a GTA will come and find you when it is your turn to get help.
Outside of team study sessions, you can post a query on our Piazza discussion forum. We aim to respond to queries raised on Piazza within 3 working days.
Please try to keep the workload manageable for the course team by checking through past posts on Piazza before raising a new query. That allows us to help as many students as possible in the time we have available.
17.3 The Coursework Instructions
17.3.1 Step one: Clone and Import the Project into Eclipse
In Eclipse (or whatever IDE you have chosen to do the coursework on), import the project for the coursework by cloning from this URI:
https://gitlab.cs.man.ac.uk/COMP23311_2023/sliding_puzzle2_<your-username>.git
where <your-username> is replaced by your University username. This is a personal repository that has been set up just for use by yourself, for this activity. No other students can see its contents (though the course team and GTAs can see it).
This should cause a new Java project to appear in your IDE, ready for use. This is a version of the sliding puzzle game we used in individual coursework 1. Take a look at the History view of the project, to see the commit graph. You should see the development branch (called main in this coursework) and two feature branches. One of the feature branches has been fast-forward merged into the development branch and the other is still on-going and hasn’t yet been merged in.
ℹ️ Note ℹ️ If you are unsure of how to complete this step, refer back to steps 1 and 2 in the instructions for the 1st individual coursework exercise for this course unit (chapter 16), for detailed instructions.
17.3.2 Step two: Run and Understand the Test Cases for the Feature
An issue has been placed in the issue tracker for the project, describing the new feature you are asked to implement for this coursework. Work was already begun on the issue, and a feature branch already exists in the repository. Some test cases describing the feature have been committed to the branch, along with the bare minimum of changes to the production code needed to make the test code compile.
The branch is called: move-counter
You must check out this feature branch as a “New Local Branch”, and use the tests to guide the implementation of the new feature. The first step is to read the test code, to understand what each one is saying about the functionality that you must implement.
You should practice the techniques for test reading that were presented in the workshops (see chapter 2).
The next step is to run the tests. Since the default project classpath is sufficient for this simple project, we can do this by right clicking on the test folder and selecting Run As > JUnit Test. You’ll see that a couple of the new test cases pass, but most of them fail.
ℹ️ Note ℹ️
Test-First Development
Test-first development (TFD) is a style of software development in which we begin by writing a collection of tests that describe the new functionality to be added to the system. When we run these tests, they will (mostly) fail, because the feature they describe is not yet implemented. The next step is to make changes to the production code to implement the required feature, and thus make the test cases pass.
In this approach to development, the tests change their role. Instead of aiming to detect errors after they have been introduced into the code base, the tests take on the job of the specification: an executable specification that we can run repeatedly, as the feature implementation moves forward. The tests also therefore function as a kind of progress report, telling us how much work remains to be done before we can consider the feature finished.
But writing the test code before the production code also has a profound effect on how we design our code. When we write the production code before the tests, we often make design errors, because we are thinking too much about the code from the point of view of the implementer of the class we are working on. This makes it hard to make good decisions about what parts of the behaviour should be exposed through the class’s interface, and what should be hidden behind it.
When we write the test code first, we are forced to think about the classes we are testing from the point of view of a user of the class, rather than an implementer of the class. The process of writing the tests helps us see what information and services the class must provide through its public interface, and how they should be designed to ensure clarity and ease of use. We can then implement the feature in a way that corresponds to this design, and can concentrate on making the internals of the class clear and efficient. Implementation is often quicker and easier in TFD, because many of the hard design choices have already been made for us.
17.3.3 Step three: Implement the Feature/Make the Tests Pass
When you have a good grasp on the functionality that the tests describe, you should start implementing that functionality and making the tests pass.
Make sure you have the move-counter branch checked out before you make any changes to the code.
The usual approach in TFD is to take each failing test in turn, and to make the changes needed to make the test pass. In doing so, you should treat each test case as an example of a more general set of tests, and write the code to work for all those tests, not just the single test you are starting from.
ℹ️ Note ℹ️
Alternative Approaches to Testing and Development
Broadly speaking, there are three main alternatives to TFD in common use. They are described below.
Manual Testing (MT)
In this, the oldest form of development, no (or very little) automated test code is written for the system, and any testing that is performed is done manually. This form of development is still common in open source projects, and in code written by smaller consultancies. And even projects with excellent automated test coverage may have some tests that need to be run manually, if they depend on complex fixture set-up steps (such as hardware configuration) or have complex outcomes.
Test-After Development (TAD)
In this form of development, features are implemented in the production code, and once they are finished a number of test cases are written to check the correctness of the implementation. The tests are sometimes written by the same people who implemented the feature, sometimes by an independent development team, and sometimes (though now more rarely) by a dedicated independent test team who write test cases from the specification document. We’ve included this last case under TAD, even though the independent test team may be writing the test cases in parallel with the development, because in practice the test cases aren’t fully implemented or run until after the implementation has reached a certain level of maturity. They are rarely used by developers to inform the software design in this approach.
Test-Driven Development (TDD)
In this, the most modern of the forms of development listed here, the implementation of the feature and the set of test cases that describe it are implemented together, in small steps, interleaving the writing of test code with the writing of production code. In TDD, production code can only be written in response to a failing unit test, and only the minimal production code changes needed to cause the test to pass should be made. After each new test case passes, the design of the code base is reviewed, to look for improvement opportunities, and ways to generalise the implementation to cover more test cases of the same group.
TDD is similar to TFD, but has some important differences. In TFD, we grow the implementation of a feature to closely match the requirements described by the test cases. In TDD, we grow both the implementation and the test suite to fit the requirements, aiming to create only the tests and production code needed to deliver value to the client. It results in code with a high test coverage, strong correctness, and a lean implementation focused on the requirements. But it can be challenging to apply, requiring (at least when being learnt) both discipline and creativity.
TDD will be covered in more depth in Agile Software Pipelines: COMP33312 (along with the related technique of Behaviour Driven Development, BDD).
The implementation task for this feature is neither large nor complicated. You should not need to write many lines of code to reach a solution. You can look at the code written for the Game Timer feature, in the commits on the development branch, to get inspiration for how to handle most of the behaviour required to implement the Move Counter feature. Just follow the tests, and try to write the smallest amount of code needed to make them pass. If you don’t write enough code, the tests will tell you, by failing. If you write code that isn’t needed, the tests won’t tell you that, but you’ll have added unnecessarily to the maintenance costs of the system for the remainder of the lifetime of your code.
There are a couple of slightly tricky aspects to the implementation that do not have equivalents in the Game Timer feature. Since this is not an exercise in general Java coding, some hints are given below to help you with them, but you are free to implement the feature in any way that is compatible with the tests as given, and the description in the issue.
Hint: Switching off move counting while shuffling the puzzle
View the source of this page if you want to see the hint.
Hint: Refreshing the Move Counter from GraphicsPanel
View the source of this page if you want to see the hint.
When all the tests on the move-counter branch pass, and you have observed the correct behaviour for several cases when running the game, this step is completed.
ℹ️ Note ℹ️ The Sliding Puzzle code base we are working from has some limitations. In particular, the testing of some aspects of the GUI does not follow best practice. However, providing better quality tests for these aspects would have required the whole system to be much larger, and for us to use advanced Java elements that we have not taught you yet. We therefore decided to keep the example small and simple, for this exercise, at the expense of strict adherence to good practice.
17.3.4 Step four: Commit and Push the Feature Implementation
You can now make a commit containing the details of your implementation. If you want to make multiple commits, that’s fine, too. But the commits must appear on the move-counter branch (and, at this stage, only on the move-counter branch).
When you have finished committing your code changes, push the move-counter branch to the remote repository (origin). It is important you push the branch at this stage, so that the automated marking system can pick up your code changes accurately.
Depending on the IDE version you are using, you may need to set up the push ref specs for this repository. Information on how to do that is given in the instructions for the 1st individual coursework, step 7 in section 16.3.7.
This step is complete when you can see all your changes and commits on GitLab, and when the move-counter branch on GitLab is pointing to the same commit as the end point of your local move-counter branch.
17.3.5 Step five: Merge your Code into the Development Branch
Now that the feature implementation is complete, we can merge the changes into the development branch.
Start by checking out the branch that you want to include the new feature on: in this case, main. (Make sure to check out main as a local branch if you have not already done so. A common error for Git beginners is to check out the remote tracking branch instead of making a new local branch. This will lead to an incorrect merge. As a handy rule of thumb, for the purposes of this course unit, you never need to check out a remote tracking branch. Stick to checking out local branches only.)
In the History view of your project, right click on the commit that the move-counter branch is pointing at (that is, the commit that contains the changes you want to merge into the checked out branch), and select Merge.
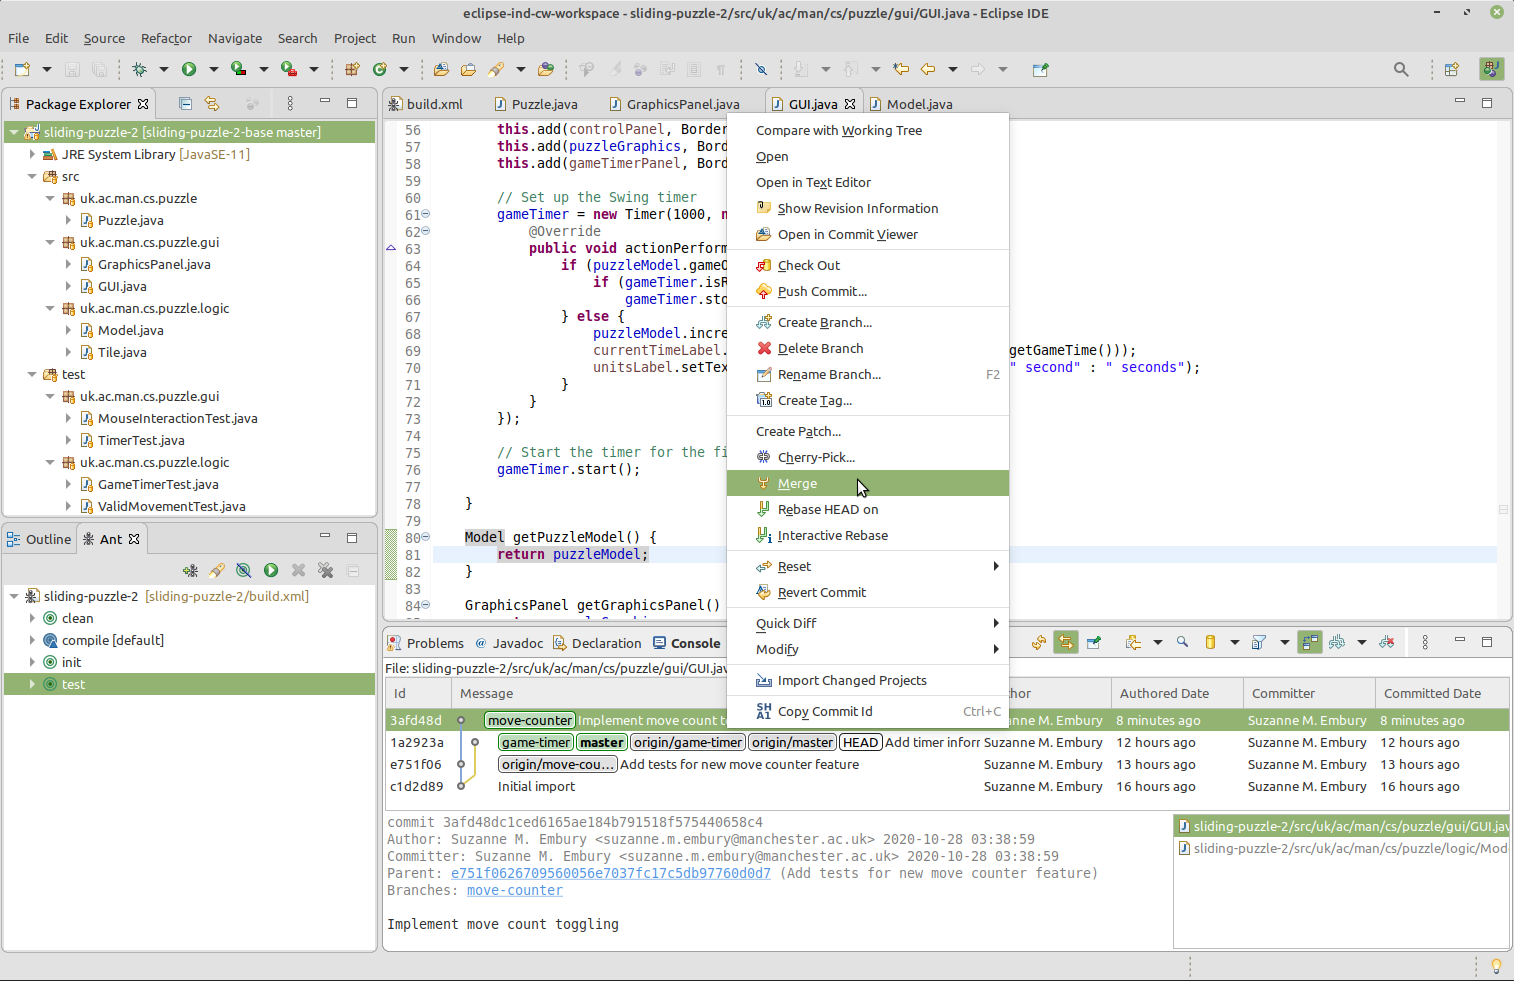
Figure 17.1: Merge to Main Menu
⚠️ Caution ⚠️ This screenshot is shown for illustration of the steps needed in Eclipse only. The code changes shown are not part of the solution for the coursework. This applies to all screen shots in these coursework instructions. They don’t give away any part of the code solution.
Note also that in the screenshots, the development branch is called master, not main. Formerly, it was common to use the name master for the development branch, but more recently the name main is preferred. You should see the same results as in the screenshots except that you will see main where master is shown. (Thanks for bearing with us as we work through the removal of problematic terminology from our course materials.)
Note This exercise is set up so that the merge you are asked to attempt here will be paused, because conflicts will be found.
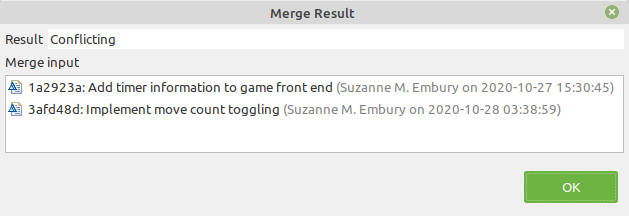
Figure 17.2: Merge results showing conflicts
When you see this conflicting merge result, the step is completed.
⚠️ Caution ⚠️
Part of the point of this exercise is to walk through the experience of detecting and resolving conflicts between two independent lines of development, and to understand how Git helps us to manage those conflicts. If you followed the natural conventions and approaches when implementing the Move Counter feature, you will discover conflicts when you try to merge. If you have found some clever way to implement the feature that avoids conflicts at this merge (e.g. by rebasing the feature branch onto main before starting the implementation of the feature), you’ll need to think again. You can’t get full marks for this exercise unless you implement the feature in a way that causes conflicts.
17.3.6 Step six: Resolve the Conflicts and Complete the Merge
If you look at the History view after the merge attempt of the previous step, you will notice that no merge commit was created, and the move-counter branch is still shown as being separate from and unconnected with the main branch.
When Git discovers that conflicts are present, it will refuse to make the merge. But, the merge operation doesn’t just fail. Instead, Git suspends the merge operation, allowing us to resolve the conflicts and then to continue with the merge. In this step, we’ll carry out both these actions.
17.3.6.1 Walkthrough of the Conflict Resolution Process
We’ll now walk through an example conflict resolution, to show the procedure you should use in your own coursework. The code changes mentioned here are just for illustration, and are not part of the solution to the coursework.
Our first task is to understand what conflicts are present. Git does the work of detecting these for us, and annotates the source files with special mark-up, showing the scope of the conflicts. Modern IDEs can understand this mark-up, and use it to present different visualisations of the conflict to us. The following screen shot shows both these visualisations in action: the Git conflict mark-up in the editor window and an IDE specific conflict markup in the Package Explorer view.
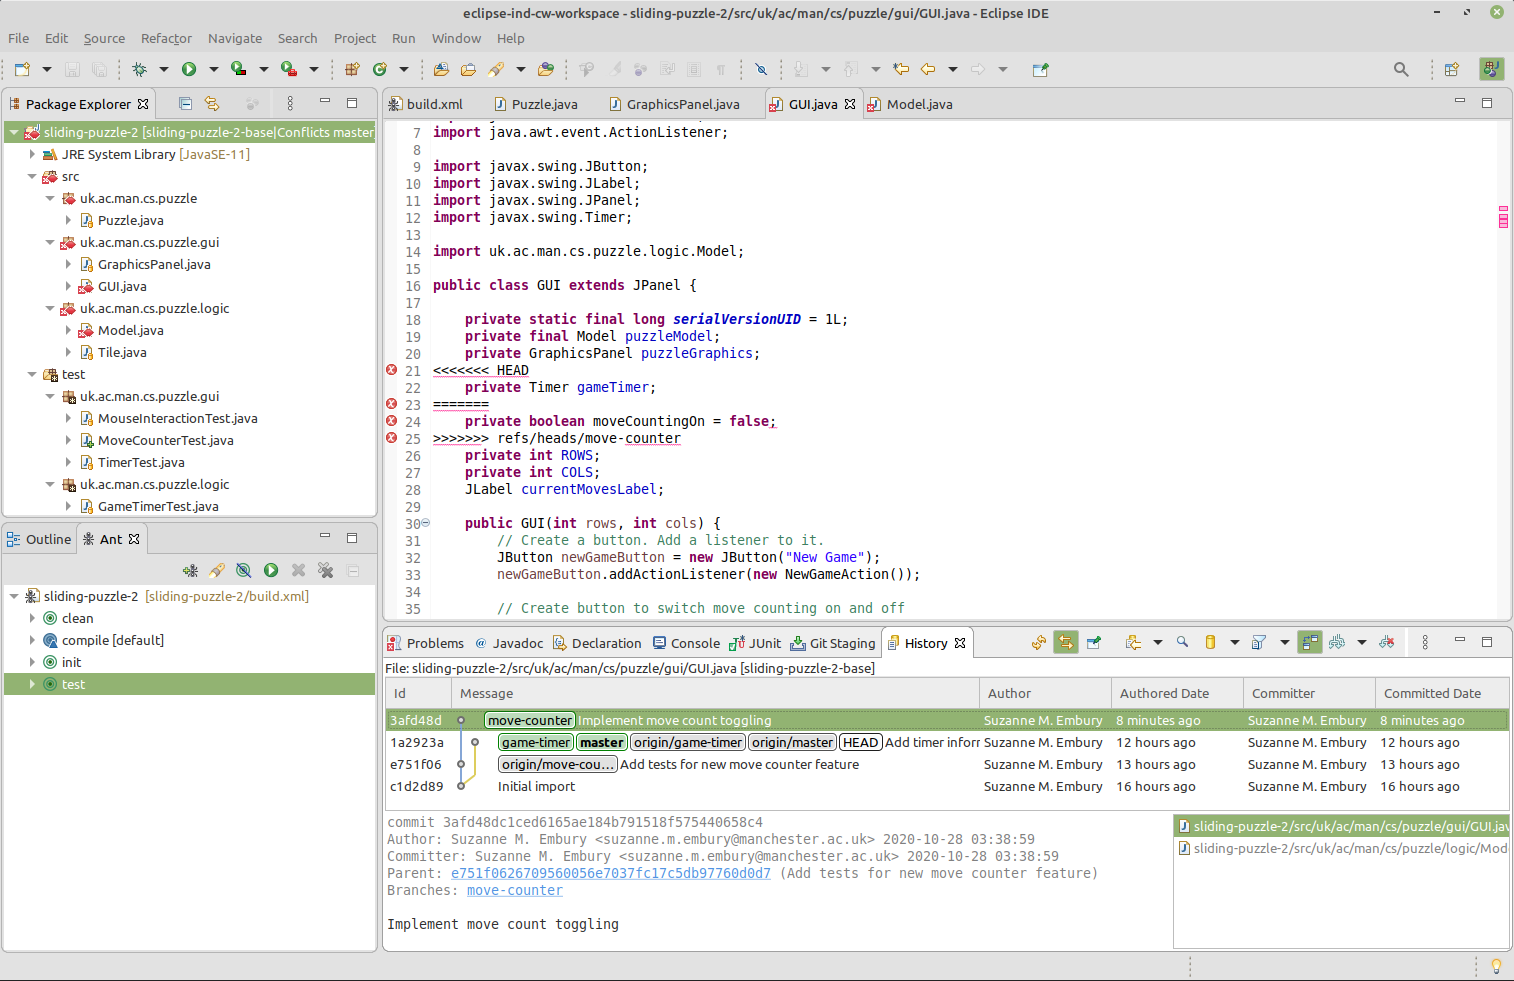
Figure 17.3: Conflicts shown after merge paused
ℹ️ Note ℹ️
What Are Integration Conflicts?
Conflicts occur when the same line of code is changed in different ways in the two lines of development that we are trying to integrate. Git can’t work out automatically what the final integrated code should be—that requires a detailed understanding of the purpose of the code that Git cannot have. A human developer must take the time to work out what the integrated form of the two code versions should be, and to rewrite the code until it takes the desired form.
If a line of code is the same in both versions of the code, then the situation is easy. Git will adopt that as the form of the line in the integrated version of the code.
If a line of code changes in only one of the versions, Git will take the changed form as the integrated version of the code. Git assumes that the newer version of the line takes precedence, and carries it forward into the integrated version of the code.
If the line of code changes in both versions, but changes in the same way, this is also easy to handle. Git will take either version of the line of code (since both versions are the same) and use that in the merged view of the code.
The problem arises when both versions of the code have made different changes to the same line of code. This is when conflicts occur, and when Git needs help from a human developer.
Eclipse marks files that contain conflicts with a special red, double-arrow decorator. The files also have a “does not compile” decorator on them. This is because the conflict markers introduced into the files by Git are not part of legal Java syntax.
The editor window shows this Git markup. It consists of three horizontal lines, separating the different versions of the code. In this case, between the top and middle bars we see the code as it is in the currently-checked-out (unmerged) main branch. (You will recall that HEAD is a shorthand branch name, referring to the currently checked out branch.) Between the middle bar and the bottom bar we see the version of this line of code as it presently is in the move-counter branch in the Git repository.
There are two ways to remove these conflicts. One is to edit the files directly, to remove the conflict markers and replace the separate code versions with a single integrated version. In the example shown, for example, we might decide that both variables declared in the conflict need to be present in the final merged code version. In that case, we edit the file to make that happen showin in figure 17.4
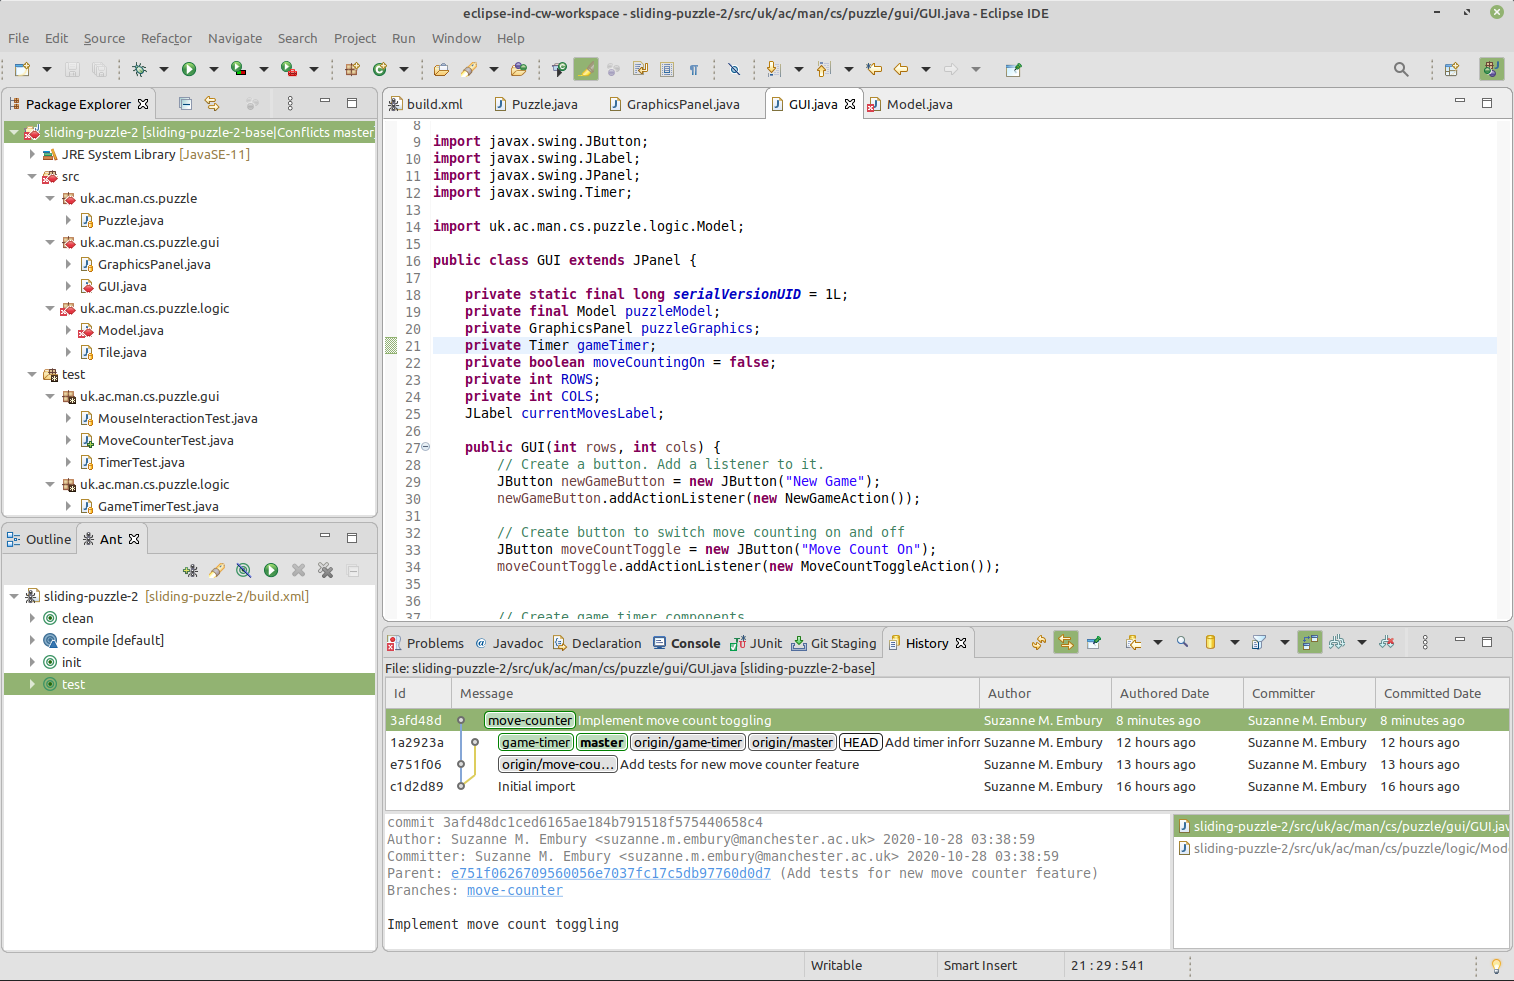
Figure 17.4: Manually edit out conflict
This has removed the conflict from the GUI class.
The alternative way to handle the conflicts is to use Eclipse’s Merge Tool. Right click in the editor window, and select Team > Merge Tool from the context menu that appears.
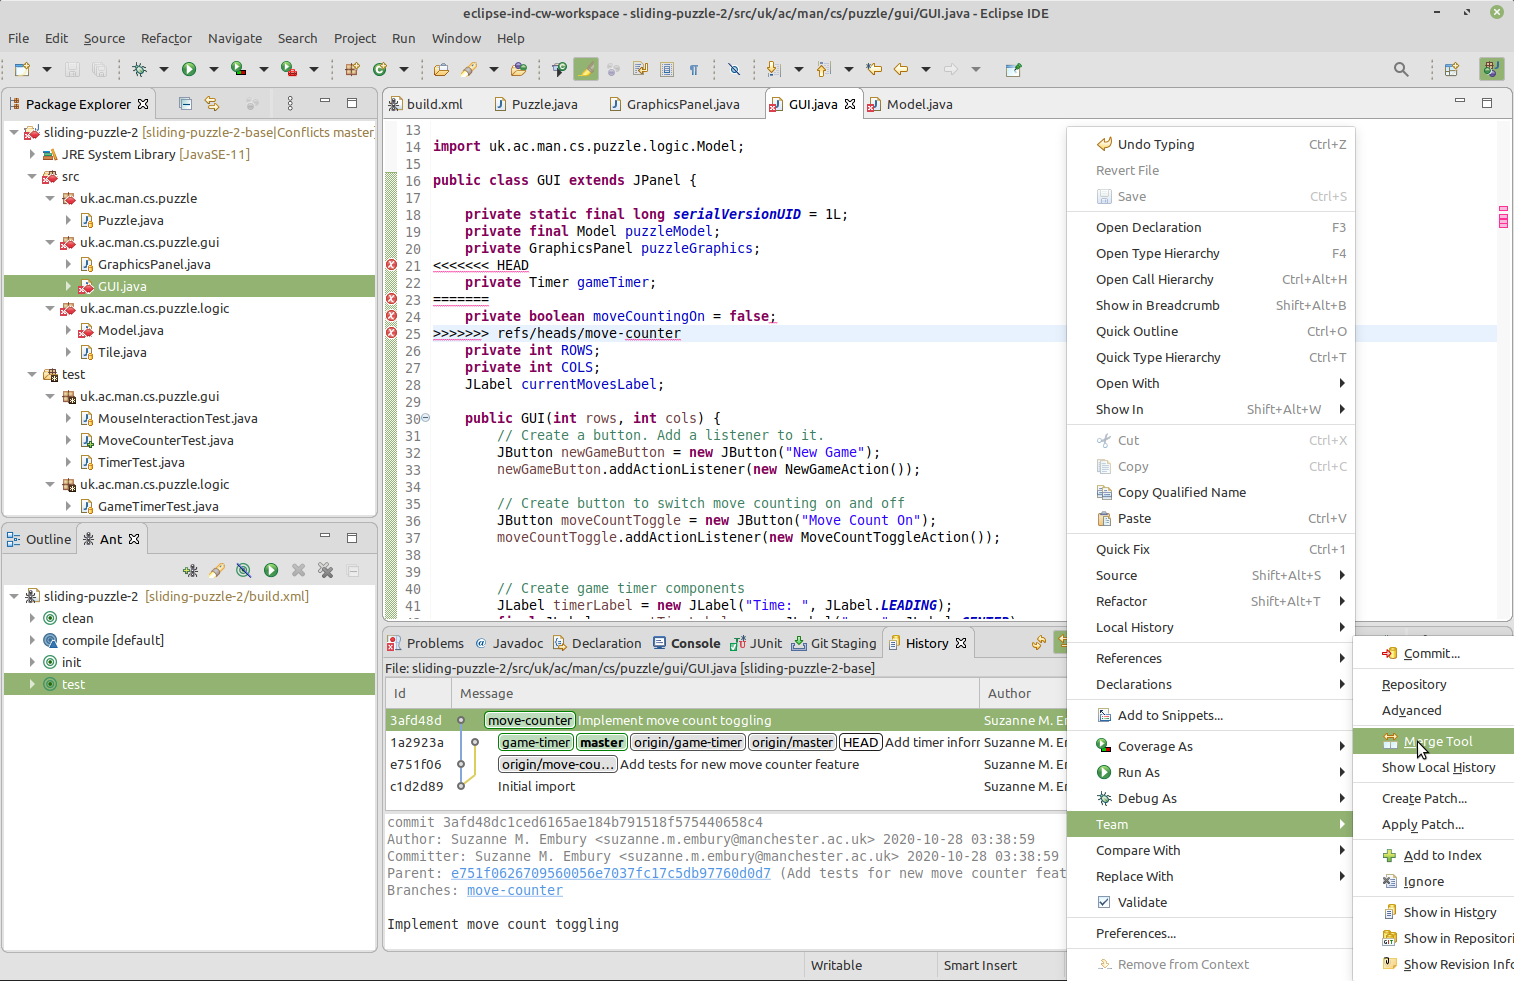
Figure 17.5: Invoking the merge tool
The Merge Tool shows both versions of the code, side-by-side, with the changed lines colour coded for easy detection of places where attention is needed. The left hand window shows the version of the code in main, while the right hand window shows the version of the code in move-counter. The coloured bars between the windows show the changes: grey lines are present in main but are not in move-counter, purple lines are present in move-counter but are not in main, while red lines are present in both versions and are in conflict.
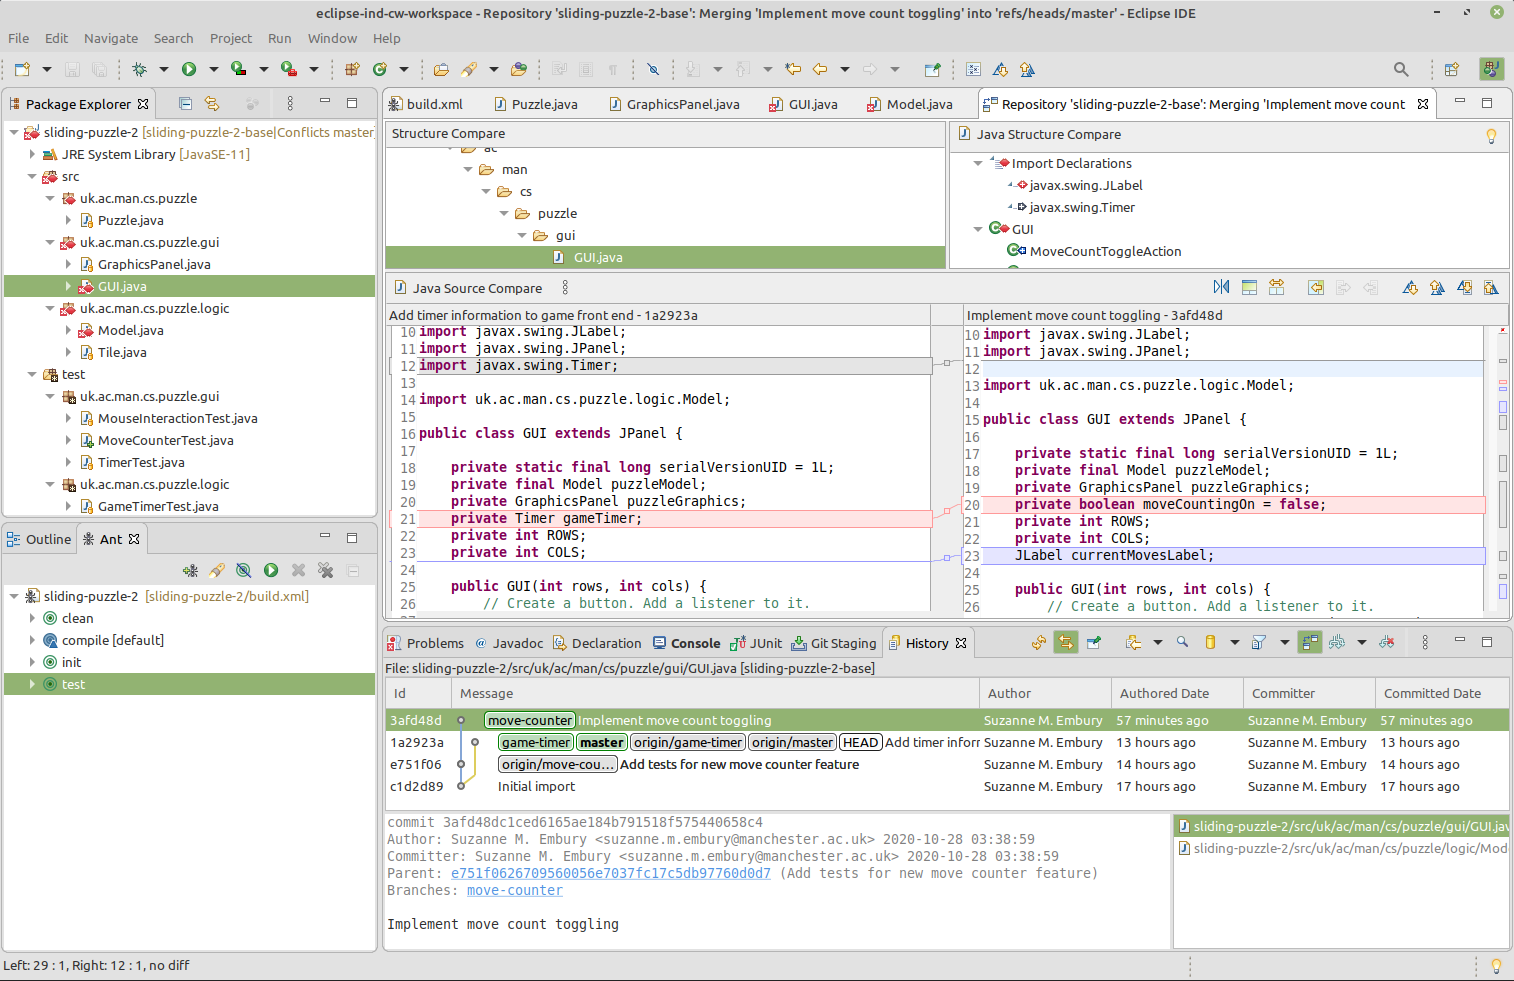
Figure 17.6: Merge tool showing conflicts
Our task is to edit the file in the left hand window, so that it contains the desired integration of the changes in both files. in this case, it’s an easy change: we need to include both lines unchanged, so we copy and paste the line from the move-counter window into the main window. Then we save the file.
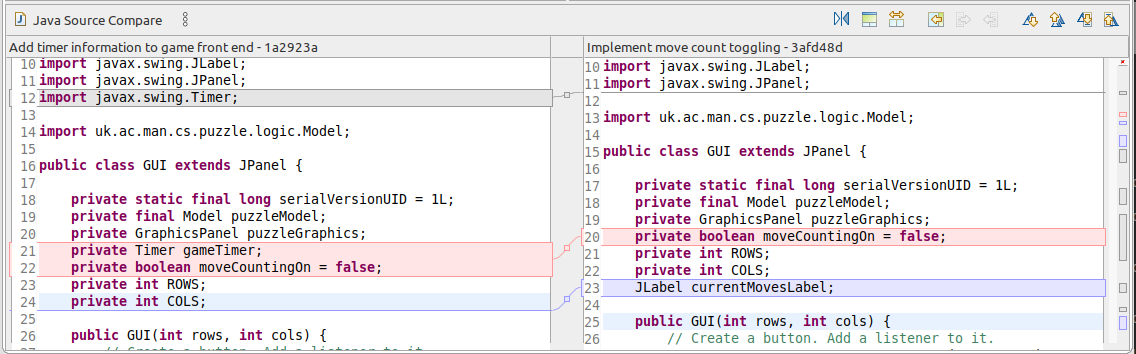
Figure 17.7: Edits in merge tool
Both ways of removing the conflict also remove the compilation error from the file. You should see this decorator being removed from the file in the Package Explorer view. The conflict marker remains on the file, however, as we have not yet told Git that we believe the conflicts have been removed. We do this by committing the changes that resolve the conflicts. This will not result in a normal commit, but flags the changes to Git to be included in the merge.
To let Git know that the conflicts have been resolved and the merge should continue, right click anywhere in the Eclipse windows/views, and select Team > Commit. This will bring up a special version of the Git Staging view, tailored for recording resolved conflicts.
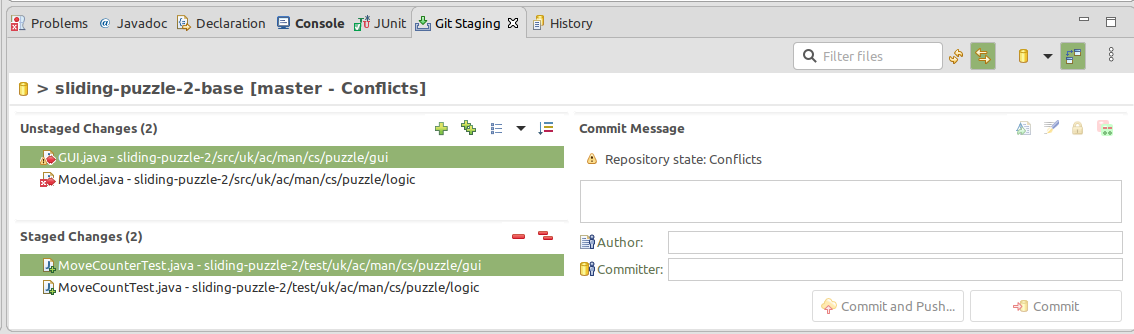
Figure 17.8: Special commit view
If we now stage the changes we’ve made to the GUI class, the conflicts decorator is removed:
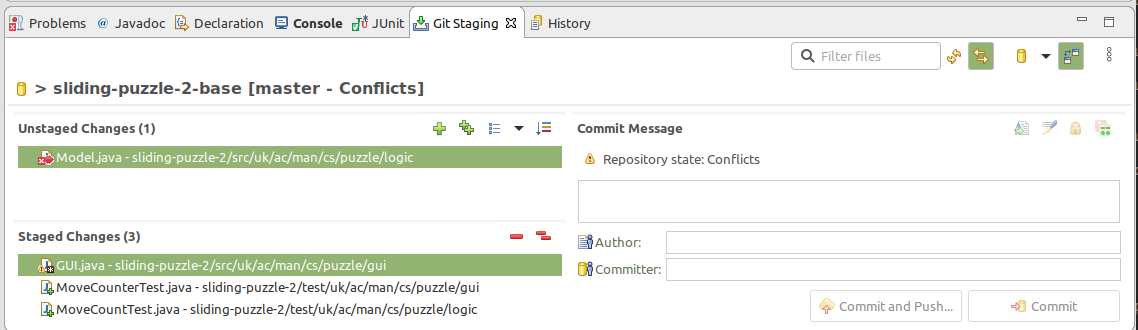
Figure 17.9: Commit view after GUI staged
If we repeat the conflict removal process with the Model class, and also stage it for changes, the commit view changes to the following:
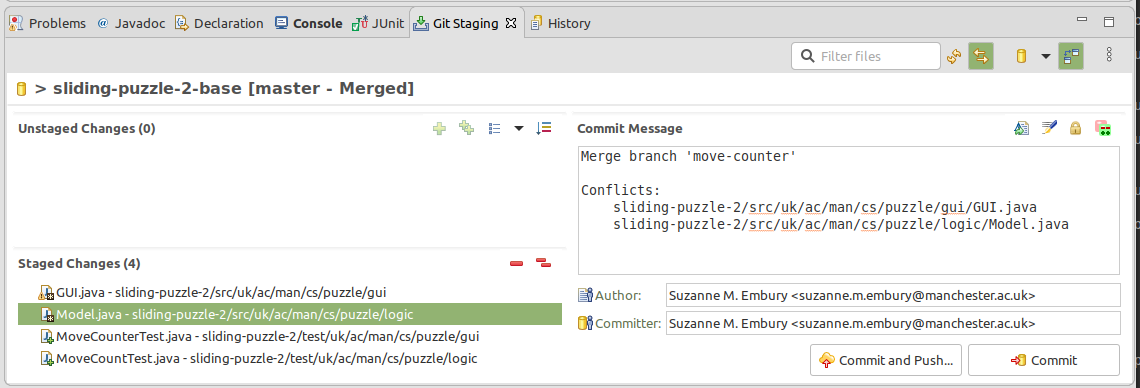
Figure 17.10: Commit view when all conflicts have been removed
Notice that Git has now provided a commit message and has added in the author and committer details. This is because Git recognised that we have now dealt with all the files affected by conflicts from the recent merge and are ready to proceed with it.
We can now edit the merge message if we want to. You should always leave automatically generated merge messages unchanged, as they provide useful metadata for understanding the flow of code change that has happened on the repository, though it is always possible to add extra information if needed. For example, if some aspect of the conflict resolution was tricky or complex, it is useful to add a note explaining that to the merge commit.
For this coursework, we ask that you add some extra information about how you handled the conflicts to the end of the commit message, but that you leave this automatically generated message unchanged at the start of the message.
The local history view of the project now shows that the feature branch has been merged into main, with a merge commit. The resulting code version contains both features, integrated together.

Figure 17.11: Local history after merge completed
17.3.6.2 Now It’s Your Turn
For the coursework, you next task is to find and resolve all the conflicts introduced by the integration of your new Move Counter feature with the existing game features. Specifically, you are integrating your work with those features that were added to the code base since the start of your feature branch: the Game Timer feature, in this case.
You therefore need to use the conflict resolution tools discussed in this document to create a version of the game that has both the Game Timer feature and the Move Counter feature, and that passes the tests for both features (and the existing test suite). This is a non-trivial task. You will need to think carefully about how you can get the two features to work well together in the single code version.
A good starting point would be to read and understand the Game Timer feature code that you are going to be working with, including (of course) the tests.
Make sure that the all the tests pass on the version of the code with the conflicts resolved, before you ask Git to continue making the merge commit. And don’t forget to test the game manually by running and playing it. The automated tests won’t catch all problems, and should be supplemented by a small amount of carefully targeted manual testing.
Hint: Making the Move Counter and Game Timer Appear Below the Main Game Panel
View the source to see the hint.
ℹ️ Note ℹ️ Suzanne’s Tips for Conflict Resolution
- Having to fix conflicts makes us appreciate it when our colleagues keep commits tightly focused on the task in hand, and avoid unnecessary and irrelevant changes to code layout, spurious comments and random reorganisations of the code. These changes add nothing of value to the code base, and can considerably complicate the task of conflict resolution. Be a good team member and keep your commits clean and lean.
- I try to run my IDE’s automatic formatter over all files before committing them. I may not like the automated format that comes out in all cases, but it is worth putting up with a slightly ugly layout if it means I won’t have to deal with spurious formatting changes when I next need to resolve conflicts.
- I find it helps to decide in advance the
orderin which I’ll put code for the features being integrated. For example, for this coursework exercise, I might decide to put the Move Counter elements before the Game Timer elements. This makes it quick and easy for me to be consistent about how I incorporate game changes across multiple classes, without requiring much thought. - It is worth avoiding long and intricate conflict resolution tasks, especially close to the deadline. Keep the scale of each resolution task low, by syncing frequently with your remote. When implementing a new feature, I try to find a series of small
mini releasesthat I can implement and merge individually, to keep the scale of the conflict resolution task down. - I preferred to manually edit out conflict markers when I was first encountering Git, but now prefer to use the Merge Tool when using Eclipse. Use the approach that’s best for your current stage of learning.
- When using the Merge Tool, I normally expand it to fill the whole Eclipse window, so that I can see as much of the code that I am changing as possible, and can better understand the risks of what I am doing. Sometimes the implications of a particular conflict resolution affect lines of code some way away from where the conflict itself is located.
- When you think you’ve fixed the conflicts in a file, you may discover you have caused compilation errors due to the changes affecting other classes. So check all files where Eclipse is reporting compilation errors and fix them, looking especially for errors in files you have not changed in your feature branch, before continuing with the merge commit.
- Make sure you run the tests as soon as you have got back to compiling code. It’s really easy to break things in the code you are merging into, especially if you didn’t write it. With good test coverage, the test suite will insulate you from some of these potential errors. If you are working on a team project, getting some help with a buddy review of the code before you merge it can also help (though you may need to merge and push to a temporary branch instead of to the development branch if you need to do the buddy review remotely). Using merge/pull requests can also help with this (though it’s important to learn how to carry out merges manually first, so you really understand what these tools are doing behind the scenes on your behalf).
17.3.7 Step seven: Push the Completed Merge to the Remote Repository
After the complexities of the previous step, this one is very easy. Just push the new location of the main branch, plus the merge commit on it, to the remote, following the same instructions as for individual coursework exercise 1 in chapter 16.
Before moving on, don’t forget to check that you can see the merge commit in your remote repository on GitLab, and that all the branches are pointing to the same commits as in your local commit graph.
17.3.8 Step eight: Update the Issue Tracker and Request Marking
Finally, your last step is to update the issue tracker with a short summary of work done to resolve it.
If you have completed the implementation of the Move Counter, and have successfully integrated it into the main development line, with all tests passing, then you can close the issue. Otherwise, leave the issue open.
When all this is done, you can add a comment to the issue to tell us that you are submitting your solution for marking. Please add the text:
When we next run the marking code, and it observes this comment, you will lose Developer access to your repository, so make sure you are ready for this before posting this comment.
17.3.9 Messed Up?
If you make a mistake with the coursework, you can request a reset of your repository. To do this, post the following line on the coursework issue (that is, issue # 1) in the issue tracker of your personal coursework repository:
This request will be picked up by code, and the reset executed to bring the repository back to the same state it was in at the start of the coursework. Obviously, you’ll then lose access to any commits you made for the coursework so far, so only request a reset if you are sure it is what you want.
You can only request one reset for this coursework exercise, so use it wisely.
The code that executes the repository reset requests will be run every couple of days while the coursework is active. This means that resets don’t happen instantaneously. You may need to wait for a whole.
We’ll notify you when the final resets will be run through a Blackboard announcement.
17.3.10 Coursework Complete
This completes the instructions for the second individual coursework exercise for this course unit. If you managed to complete it in full, then you’ll be all set to apply the same skills to the team coursework. You will have practiced some basic test first development. And you’ll be ready to collaborate on team Git projects, and to handle the code integration conflicts this so often entails. You should also have a better understanding of the practical importance of writing clear, focussed commits.