16 Individual Coursework 1
16.1 Introduction
The first piece of coursework for COMP23311 is an individual exercise designed to help you warm up your Git and Java skills after the long summer holidays, so that you are ready to collaborate with your team on the team-based coursework. It takes you through the simple Git workflow we’ll be using in the team coursework later in the semester and introduces some basic Java testing and debugging concepts. You’ll carry out the following steps:
- Clone a GitLab repository.
- Compile the code and run it.
- Test the code using an automated test suite to reveal a bug.
- Make a new branch in the repository.
- Fix the bug and see the tests pass.
- Commit the fix to the repository.
- Merge your branch with the development branch.
- Push your changes to your remote repository.
- Update the issue tracker to record the project status.
Detailed instructions for carrying these tasks out from within the Eclipse IDE are given in this document. We focus on Eclipse as that is the IDE used for the team coursework. You are free to use any IDE that you wish to carry out this individual coursework exercise, but we can currently only provide instructions and technical support for Eclipse.
Once the exercise is completed, you should be ready to use the same workflow on your team’s repository in the first team coursework exercise.
Trouble-shooting: If you experience problems when completing this exercise, you can find a trouble-shooting guide on the Department’s wiki at:
wiki.cs.manchester.ac.uk/index.php/LabHelp:Main_Page
We’ve provided two indexes into the trouble shooter, to help you find your way around. One is an index of error messages:
wiki.cs.manchester.ac.uk/index.php/LabHelp:Errors
If a specific error message is being reported alongside the problem you are experiencing, then you can look for it in this index, and find suggested solutions that have worked for students with this problem in the past.
The second index contains descriptions of more general symptoms:
wiki.cs.manchester.ac.uk/index.php/LabHelp:Symptoms
Use this index when something is going wrong but you do not have a specific error message to help you track down the cause of the problem.
Please report any problems you encounter that are not covered in the troubleshooter, giving details of specific error messages and screenshots where appropriate. You can report problems on the course unit forum (Piazza) or through the Live Help Queue in Team Study Sessions. We’ll do our best to help!
16.2 About the Coursework
16.2.1 Key Information
The exercise will be marked out of 10, and will count towards 7 percent of your total mark for the course unit.
The deadline for the exercise can be found on Blackboard.
You’ll submit your work through your own private GitLab repository. This is created for you, and should be visible in your personal project list through the GitLab web interface at
At the deadline, we’ll make a clone of your repository and run the automated marking code. You just have to make sure you have pushed your Git branches and commits to your GitLab repository by then, and make a comment in your issue tracker to let us know the work is ready to mark. There are no additional submission steps.
16.2.2 Submission Procedure
To submit your work for marking, you must add a comment to the coursework issue in the issue tracker of your project, saying:
Project ready for marking.
The time of submission will be the time at which this comment was added to the repository.
If this exact phrase is not present as a comment on the coursework issue at the deadline, we will assume that you were not ready to submit the work and you’ll get a mark of 0.
You may delete and re-add the comment as many times as you like up until the formal deadline for the coursework. Once your work has been marked, we will ignore any further changes to your issue tracker; it will not be possible to request marking for a second time once marking for your project is complete and the feedback has been uploaded to your issue tracker, even you have been granted an extension and your extended deadline has not yet passed.
Any changes to your repository made after the final eligible marking request comment will be ignored by the marking process. So make sure you have definitely finished all your work, before you add the comment, especially if you are submitting after the deadline.
16.2.3 Marking Scheme
This coursework exercise consists of 9 steps. If you complete them all correctly, then you should earn full marks against the marking scheme shown in table 16.1.
| Criterion | Marks |
|---|---|
| At least one new commit has been made by the student and pushed to the GitLab repository | 1 |
| The new commits have the author and committer e-mails set to the student’s University e-mail address | 2 |
| A feature branch with the correct name has been created and pushed to GitLab | 1 |
| The feature branch appears to have been merged with the development branch | 2 |
| The tests all pass on the development branch | 2 |
| The tests all pass on the feature branch | 1 |
| The issue has been closed if the bug fix has been merged into the development branch and the tests all pass, and has been left open otherwise | 1 |
| Total | 10 |
Note that we can only mark work that is present in your GitLab repository, while the earlier steps involve doing work in your local Git repository. We won’t be able to see that work until you get to the final step, and push your commits and branches to your GitLab repository. If you reach the deadline with some of the steps incomplete, and want us to mark what work you have done, you’ll need to jump forward to step 7 and work through as much of it as you can before the deadline to allow this.
16.2.4 Pre-Deadline Feedback
To give you a chance to see how well you have understood and applied the principles underlying this coursework exercise, we will run the marking code a little ahead of the deadline, to generate provisional marks and feedback on the work completed by that time. The feedback and a provisional mark will appear on the GitLab issue tracker for the coursework repository.
The provisional marking deadline is usually set for the end of week 1. The exact deadline can be found on the Blackboard site for the course unit.
You will then have several days to make corrections before the final marking process takes place, shortly after the final coursework deadline in week 2.
You don’t have to do anything specific to request this provisional marking. We will mark all the repositories at this time, and provide what feedback we can based on whatever work you have done at that point.
16.2.5 Late Submissions
This coursework uses the University’s standard policy on marking work that has been submitted late.
A penalty of 1 mark will be applied for each 24 hour period following the deadline that the work is late, up a total of 10 such periods. Note that for the purposes of this calculation, weekends and evenings are counted. This means that, since this coursework’s deadline is on a Friday, a submission on the following Monday morning will receive a penalty of 3 marks.
These penalties will be applied until all marks earned by the student have been removed. Marks will not go below zero.
Work which is submitted more than 10 calendar days after the deadline will be considered a non-submission and will be given an automatic mark of 0. At the discretion of the course leader and the Department, we may be able to give the mark the work would have achieved if not submitted late, along with feedback explaining it. Contact the course team leader if you want to discuss the possibility of doing this.
For this coursework, the submission time will be the date and time at which you place the comment saying the work is ready for marking on the issue for the exercise. All work that has been pushed to GitLab by that date will be marked. Any commits or references that are not pushed to GitLab until after marking is requested will not be considered during marking, even if they were created or modified in your local Git repository before this.
Once the initial deadline has passed, we’ll only be running the automated marking software every couple of weeks. So, there may be a delay in receiving your mark and feedback for a late submission.
16.2.7 How to Get Help
Help with this exercise will be available in the team study sessions before the deadline for submission. See Blackboard online.manchester.ac.uk for details of when and where these sessions will run.
Help is also available through the Piazza discussion forum piazza.com/class/lm0s5lzly5q41i.
16.3 The Coursework Instructions
16.3.1 Step One: Start Eclipse
First we need to run Eclipse (or the IDE you have chosen to use for this activity, if using a different one).
Start 2022-12. From the command line, this is done by typing:
You can also find it in the Applications menu, under Programming.
If it is the first time you have run this version of Eclipse, you will be prompted to create or select a workspace. This is just a folder where your Eclipse projects will live. Choose the default offered, or use the file browser to choose a location that you prefer and make a folder with an appropriate name (such as EclipseProjects). Or you can make a workspace that will contain only projects relating to COMP23311, such as COMP23311Workspace
Once you have told Eclipse which workspace you want to use, Eclipse will load.
If this is the first time you have accessed this workspace, then you will see a Welcome view, giving links to tutorials on using Eclipse. Click the cross on the tab to remove it. You should now see the basic Eclipse window, with default code views opened and ready to be used.
16.3.2 Step Two: Clone a GitLab Repository in Eclipse
The next step in the activity is to ask Eclipse to clone the required GitLab repository, and import its contents as a Java project.
Choose the File > Import menu option.
In the wizard that appears, select the Git > Projects from Git option and click Next.
There are two ways to import a project from Git. You can import from a local Git repository or clone a remote repository. We’re going to work with a project that is currently stored remotely in GitLab, so select Clone URI from the list of options and click Next.
In the form that appears, you need enter only the URI of the remote repository that you want Eclipse to clone. Eclipse will fill in the other fields, using the components of the URI. For this activity, you should clone the repository with the URI:
where <your-username> is replaced by your University username. This is a personal repository that has been set up just for use by yourself, for this activity. No other students can see its contents (though the course team and GTAs can see it).
⚠️ Caution ⚠️
Note that the URI you need to give when cloning a remote Git project is not the same as the URL of the GitLab page describing the project, even when using the HTTPS protocol. Make sure you have the right URI by checking against the one given on your project’s main GitLab page, via the Clone button. It should end in the string .git.
Once the URI is entered, Eclipse will fill the other fields for you. (If this doesn’t happen, it’s likely that something went wrong when copying the link text from this pdf. Try copying it directly from values given with the Clone button on the GitLab page for the project, instead. If you are still getting an error, get help in one of the team study sessions.)
Click Next. Eclipse will connect to GitLab to authenticate your connection. Since we are using the HTTPS access protocol here, you will need to enter your University username and password at this point. (You will also be given an option to save the details, so you don’t need to enter them again.)
An Aside on Protocols: GitLab can authenticate through two protocols, HTTPS and SSH. In previous academic years, we’ve found the HTTPS protocol to be most stable on our lab machines, but at present we expect both protocols to work well for our students on the VM you are asked to use for coursework, or from your own machine directly, in Eclipse or with other IDEs.
If you have set up an SSH key for the machine you are using and have uploaded it to your GitLab account, and want to use the SSH protocol for this coursework, just copy and paste the SSH URI for your repository into the Repository URI field in place of the HTTPS URI. Note that you must also tick the checkbox labelled Accept and store this key, and continue connecting? for the SSH connection to work.
Information about GitLab SSH setup within the Department, including how to create and register a PGP key with our GitLab server, can be found on the Department wiki pages:
After you have entered correct login details, Eclipse will fetch some information about the remote repository. It will then ask you which branches you might want to work with in the cloned repository. In fact, all branches will be included in the clone regardless of what you select here. But Eclipse will create local versions of the branches you select (so-called remote tracking branches), in addition to the branches already present in the remote.
There is only one branch in this repository (the master branch) and that is the one we will be working with. So ensure that that branch is selected, as in figure 16.1, and click Next.
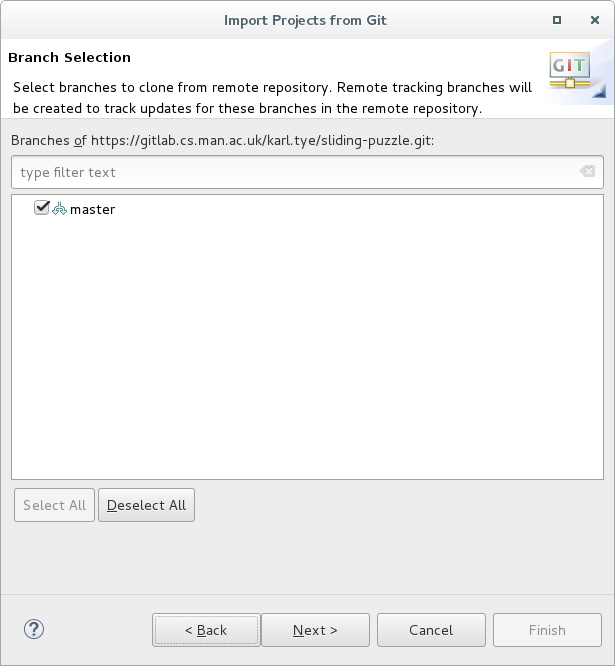
Figure 16.1: Selecting a branch
Eclipse will now ask where you want the clone of the repository to be located (i.e., which folder in your file space you want it to be put in). This can be located anywhere you like in your file space. A common convention is to have a folder in your home directory, called git, in which all your local Git repositories live. If you have such a folder, you’ll need to create a folder inside it, to hold the repository itself. So, you might request the clone to be placed somewhere like this:
After choosing or creating a suitable location for the clone, click Next.
At this point, Eclipse issues the commands to create the local clone of the remote repository in the folder you selected above. (You will need to enter your login details again at this point, if you did not save them earlier, so that Eclipse can send another request to the GitLab system.) Eclipse also checks out the branch you selected, into the folder you selected, so you should also see a src folder, a test folder and some configuration files for Eclipse in the folder you created, when viewed through a file browser or at the command line.
The next step is for Eclipse to import the checked-out files (and repository) as an Eclipse project that you can work with in the IDE. Ensure ‘Import existing projects’ is selected as shown in figure 16.2, then press Next.
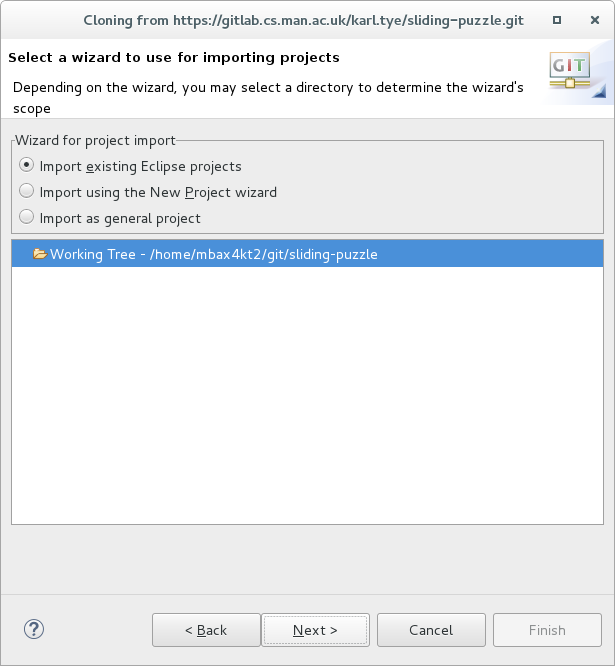
Figure 16.2: Import existing Eclipse projects
This wizard looks for existing Eclipse projects in the cloned repository. It finds just one project (hopefully, because that is how many we put in there) so all we need to do is make sure it is selected, and then press Finish.
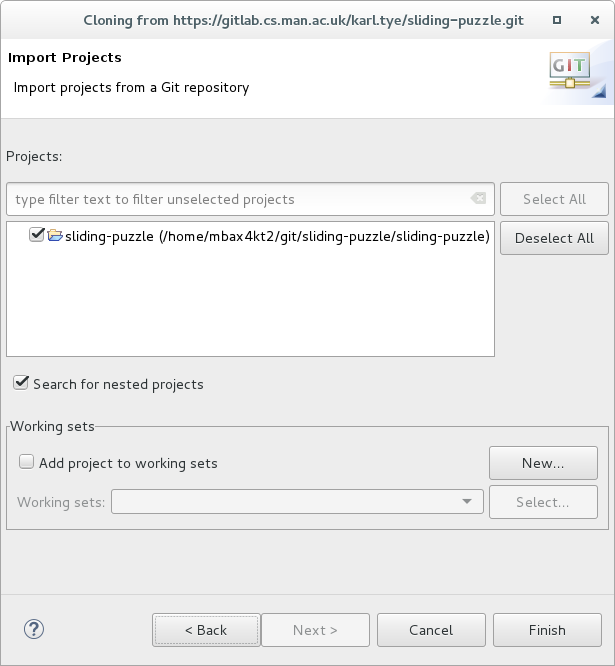
Figure 16.3: Selecting Eclipse Project to import
The project should now have been imported, and should be visible in the Package Explorer View (on the left in figure 16.4 along with any other projects you may have created in this workspace. You can double-click on the project to see the contents.
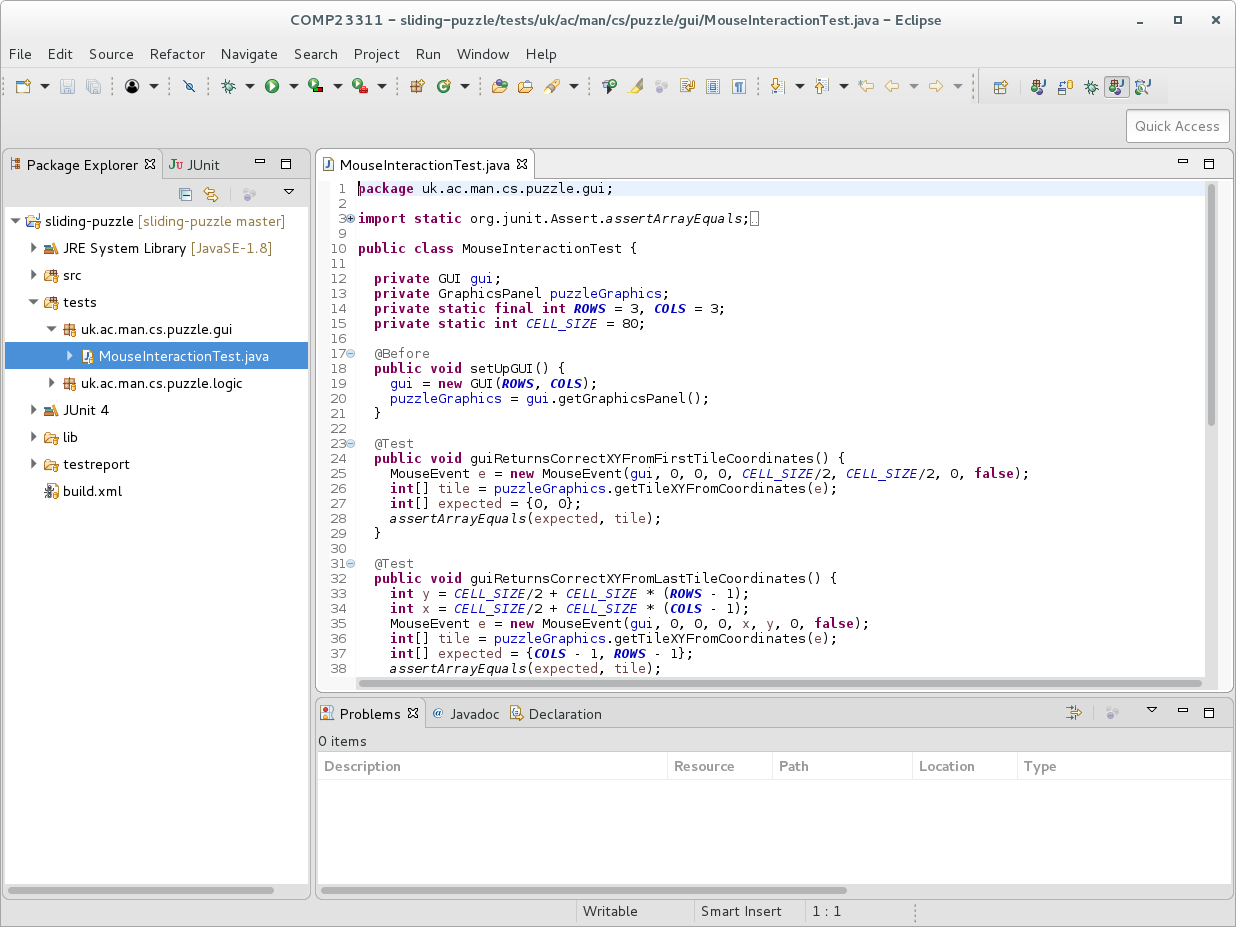
Figure 16.4: An Eclipse project loaded and visible in package explorer
16.3.3 Step Three: Identify the Bug
In your web browser, open the GitLab page for the repository created for you for this exercise and go to the issue tracker (using the menu on the left). You should see a single open issue. This issue describes a bug within the program which you are going to fix.
Your first task is to see if you can replicate this issue within the program itself. To launch the puzzle, find the Puzzle class in the Package Explorer view: it is located in the:
package within the src folder. Right click on it, and choose Run As > Java Application. The game should now appear in a window on your screen.
The game is a simple 8-tile sliding puzzle where the goal is to get the tiles in ascending order, left to right, top to bottom. Tiles can only be moved if they are adjacent to the free space. Players click on the tiles to move them into the space. The game changes the outlines of the tiles to bright green when the game is finished.
Play around with the puzzle for a while and see if you can replicate the bug which the issue describes. After you are done, close the program and return to Eclipse to continue the bug fixing process.
The code base we are working with follows a common (and useful) convention of making a clear separation between test code and production code (that is, the code that actually implements the functionality needed by the client). It contains two source folders. The one called src contains the production code, while the test source folder contains the test code.
ℹ️ Note ℹ️
A source folder in Eclipse is simply a folder that is on the build path for the project. In the case of a Java project, like this one, that means that the folder is on the Java class path. Java classes and methods stored within folders that are not on the build path will not be found by the Eclipse Java compiler and will not be executed when the code is run. Eclipse uses a special folder icon with a small package symbol overlaid on it, to distinguish source folders from ordinary folders.
The orange drum symbol indicates that the file or folder is under version control
If you double-click on the test folder, it will open up to show you its contents: two packages. The packages themselves contain a single class each.
Double-click on the MouseInteractionTest class to open it in the Editor. You should see something like figure 16.5:

Figure 16.5: Viewing the test code
This class contains 5 JUnit test case methods, each testing a slightly different aspect of the program. Chapter 24 explains how test cases are written in JUnit. You should work through that chapter before starting your team coursework, but for now, we are just going to see how to run these tests in Eclipse.
There are several ways to run a JUnit test suite in Eclipse, depending on the complexity of the program you are working with. This is a very simple project, so we can just right click on the name of the test class in the Package Explorer view, and choose Run As > JUnit Test from the menu that appears. A new view containing the test results should appear, alongside your Package Explorer. It’s a bit cramped there, and we can’t see much of what it is telling us. Double-click on the tab of the JUnit view to expand it to fill the Eclipse window. You should see something like figure 16.6
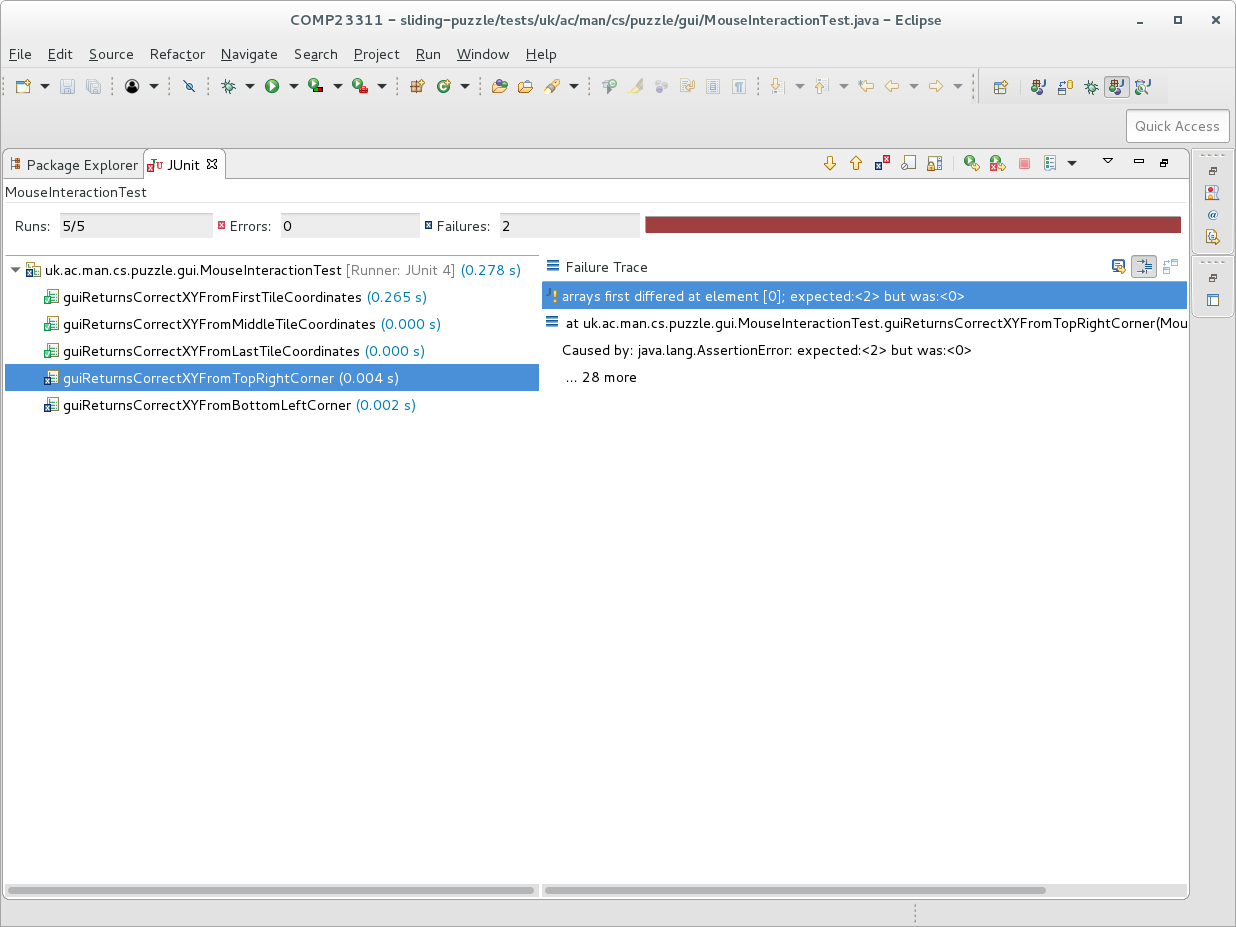
Figure 16.6: After running the tests you should see some that fail
On my system, three of the tests passed (labelled with a green tick) and two failed (labelled with a blue cross). These tests give an indication as to which classes could be responsible for the bug. The bar at the top of the view is red, showing that some tests failed. It is good practice to keep all tests passing, if possible, so our next step will be to make changes to the code, to make the tests pass. Hopefully, this will also fix the bug in the game.
Double-click on the tab of the JUnit view once more, to restore it to its earlier position and allow us to see the other Eclipse views again.
16.3.4 Step four: Create a Branch for Your Own Changes
We’re going to make a simple change to this project, and commit it to the Git repository. In this course unit, we ask you to use a very simple Git workflow, called Feature Branches. This workflow uses separate Git branches to hold your changes initially, so multiple developers can work on the code at the same time without interfering with one another and so that changes from one developer can be checked for correctness before they are merged into the main development branch. So, before we make any changes, we have to create a feature branch in our local Git repository.
To do this in Eclipse, right click on the name of the sliding-puzzle project in the Package Explorer view. From the menu that appears, select Team > SwitchTo > New Branch. Eclipse then asks you to give the branch a name.
Branch names should describe the functional change that the branch will contain. We’re going to make a change that will fix the failing tests related to the mouse interaction, so we will call the new branch mouse-interaction-fix.
Enter this exact name (without the quotes) into the dialogue box as the branch name. Make sure the Check out new branch option is selected and press Finish.
⚠️ Caution ⚠️ We will use an automated process to mark this exercise, in order to provide feedback on any errors quickly before you start work on your team coursework. So, it is important that you use the exact text given for the name of this branch, to ensure the automated process can find and mark your work.
Eclipse will now ask Git to make a new branch in your local Git repository, with the name you have given. This command creates the new branch at whatever commit was previously checked out. In this case, we had checked out the master branch, so the new branch will be created at the same commit as master.
Once the branch is created, Eclipse checks out the contents, which become visible in the package explorer. Since the new branch is at the same commit we were already at the contents of the project should look exactly the same as before. The important difference, though, is that any changes you now make to these files and folders will appear on the branch you have just created. The contents of the branch will remain in their original state.
One difference you should see, however, is that your new feature branch now appears in the annotation next to the project name in the Package Explorer view. The annotation (in square brackets) shows the repository name and the branch that is currently checked out.
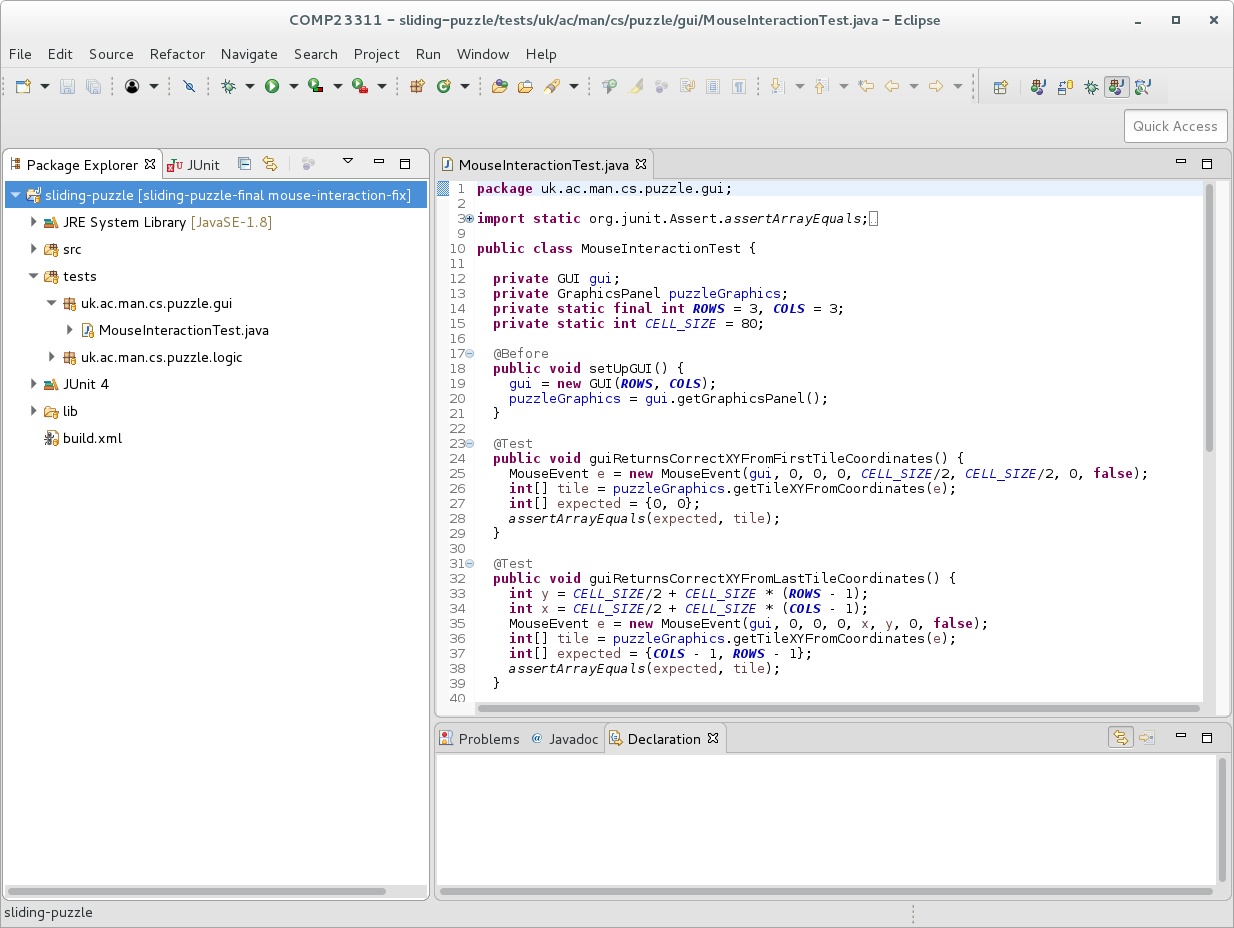
Figure 16.7: After creating branch note the annotation change in the package explorer
If you don’t see this, then something has gone wrong. If you can’t work out what it is, then you can get help from staff or a GTA in one of the team study sessions for this exercise.
ℹ️ Note ℹ️ The Team Menu
Most of the Eclipse commands for interacting with Git come under the Team menu we used here to create a new branch. You can explore around the various options to see what Eclipse allows you to do with your Git repository.
16.3.5 Step five: Commit a Change to the New Branch
Next, we’re going to make a change to one of the files in the project, and commit it to our new branch. Eclipse provides a number of views and commands to help with making commits to a Git repository. One of the most useful of these is the Git Staging view. To open this, select the following option from the menus at the top of the Eclipse window:
Window > Show View > Other > Git > Git Staging
A new view with this name should now appear. Notice that there is a box on the right for the message you will associate with the commit you are about to make. It is good practice to write this commit message before you begin to make any code changes. This helps us think about the change we are about to make, and helps to keep our commits small and focussed. In this case, please add the following text to the Commit Message box in the Git Staging view:
Your view should look like figure 16.8.
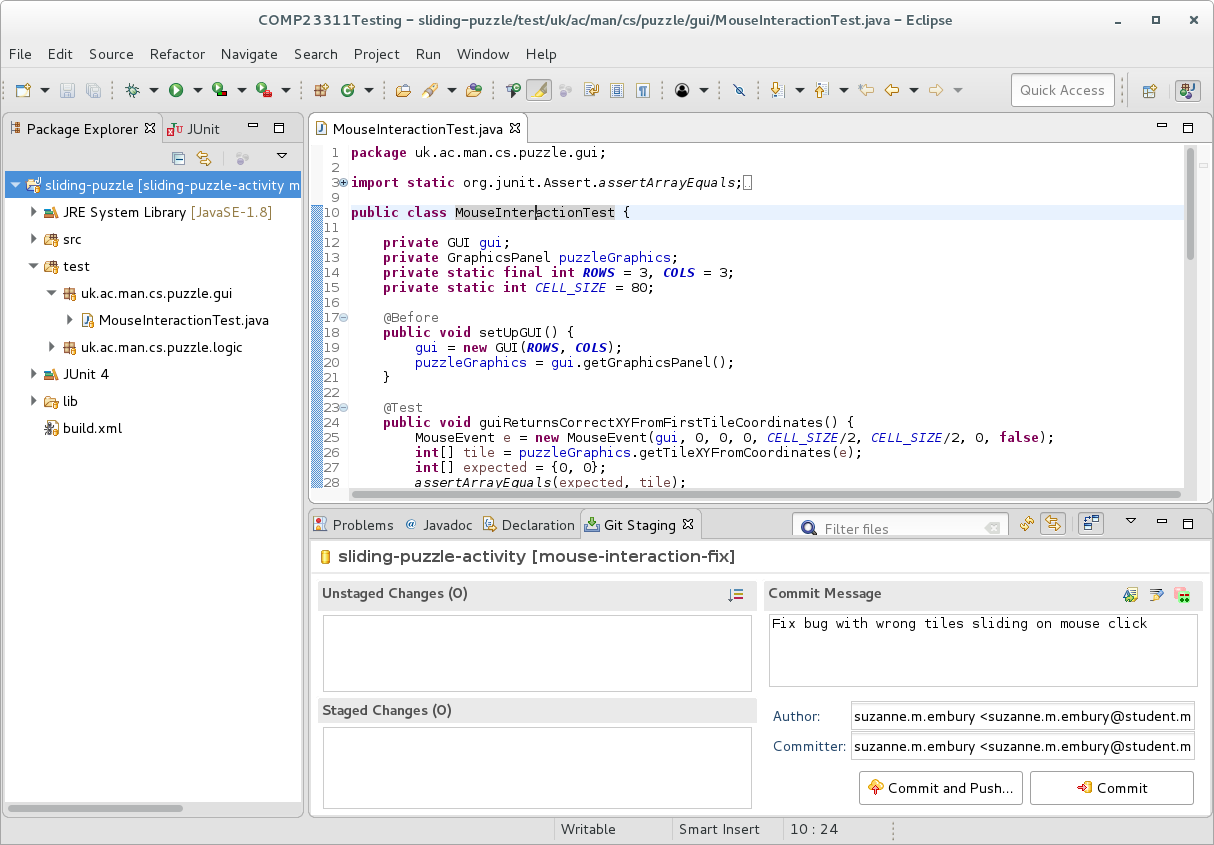
Figure 16.8: Git staging view before changes with comment
Note that, at present, the “Unstaged changes” and “Staged changes” boxes are empty. This is because (as yet) no changes have been made.
You’re going to do something about that now!
For the next part of the exercise, you need to identify the bug in the production code: that is, in the files under the src folder. Use the information provided by the failing tests to point you in the right direction. JUnit also gives a trace of why the tests fail. These can be viewed by clicking on any of the tests labelled with a blue cross in the JUnit view. You can double click on any test, and you’ll be taken directly to the point where the test failed in the Editor view.
When you think you have identified the part of the code that is causing the bug, correct it and save the file (using the floppy disk icon on the toolbar or with the standard Ctrl-S shortcut). You will notice that as soon as the changes are saved, the file appears in the Git Staging view as an unstaged change.
Figure 16.9 illustrates a file appearing as an unstaged change for a different issue than the one you are working on. (Obviously, we can’t show screenshots of the change that fixes the bug you are working on, as that would give the answer to the exercise away.)
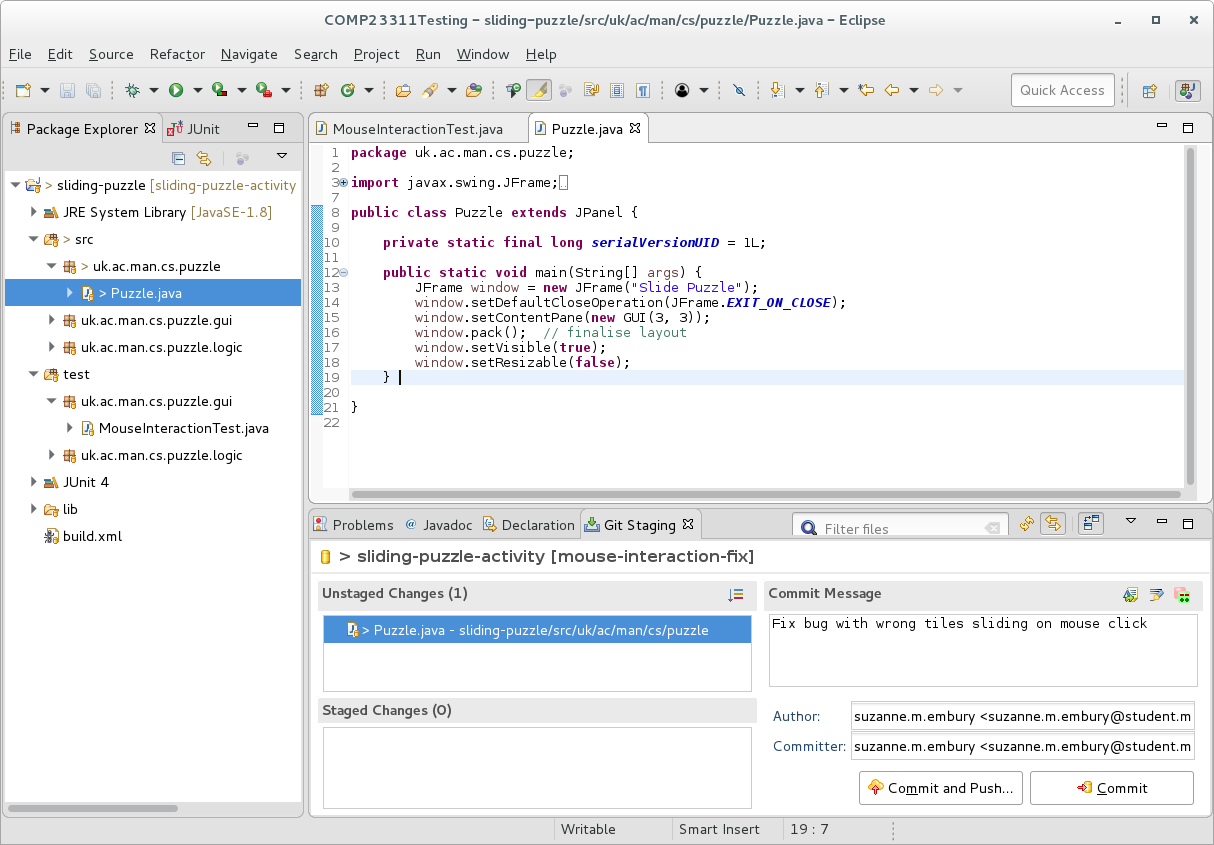
Figure 16.9: Some unstaged changes showing in staging view
Before committing the change, it is important to check that the tests now pass. Run the tests again to check that have fixed the bug, and haven’t introduced any other problems. When you have correctly fixed the bug, all the tests should pass, in both test packages, and you should see a green bar in your JUnit window shown in figure 16.10
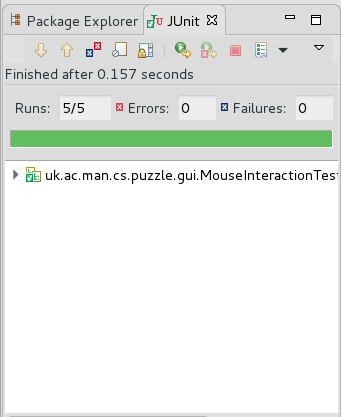
Figure 16.10: The JUnit view
If the tests do pass, run the puzzle and check that it now behaves as intended. If your tests keep failing, or the puzzle still isn’t working as it should, and you can’t find the problem, you’ll need to come to one of the team study sessions to get help from staff or GTAs.
Once the code compiles, passes all the tests, and the puzzle runs as expected we can commit our changes to our local Git repository. To tell Eclipse that the change we’ve made should be included in this commit, drag the file from the ‘Unstaged Changes’ box to the ‘Staged Changes’ box in the Git Staging view. Figure 16.11 illustrates how this should look for a different change than the one you are making.
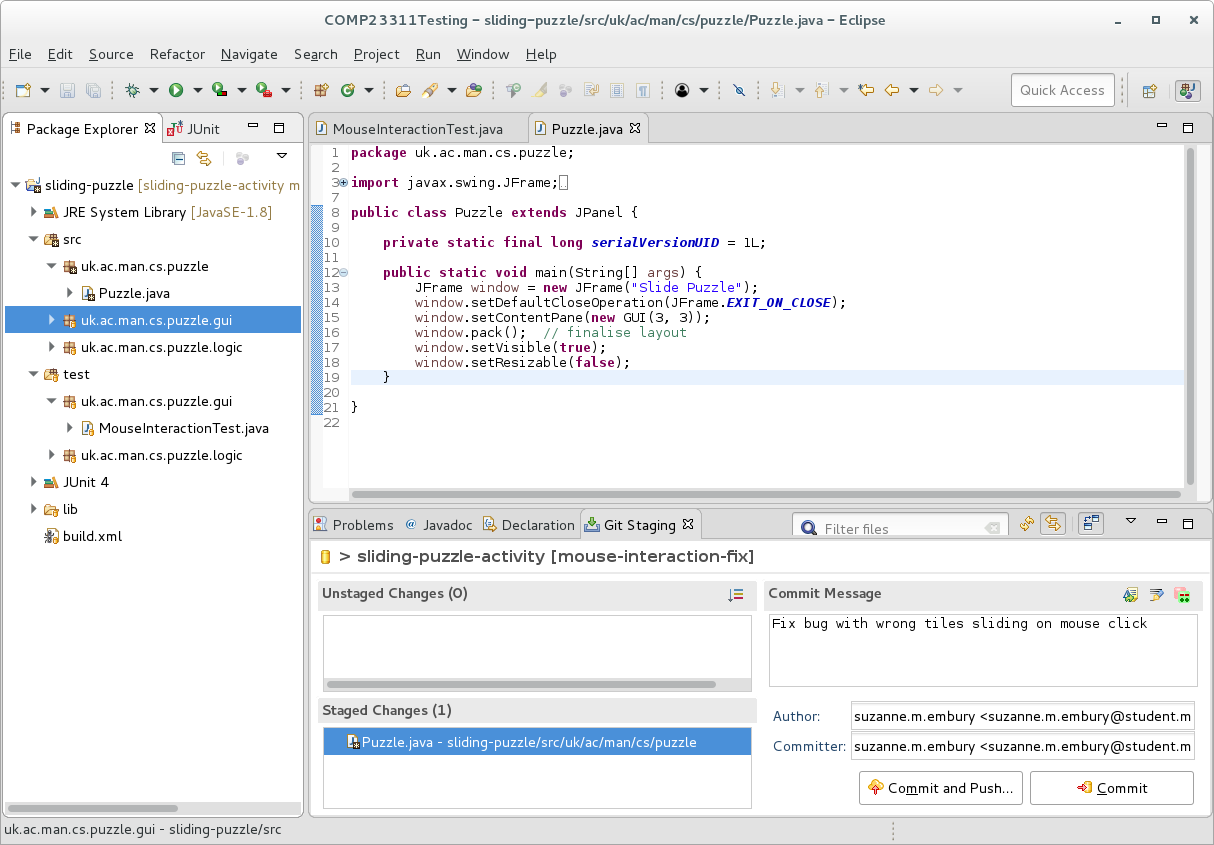
Figure 16.11: Stage the changes now that the tests pass
Before making the commit, you need to check that Git is configured correctly on the machine you are working on, so that it assigns the correct author and committer information to all your commits. We make use of a lot of automated marking code in this course unit. Our code will not be able to find your commits if you have not configured Git correctly.
Git will use the values you set for the user.name and user.email parameters to set the author/committer details for your commits. When the commits are pushed to GitLab, the GitLab server tries to guess which project member made the commits, using this information. If it cannot, the commits will still exist but they will not be linked to your GitLab user. This will make it much harder for our automated marking tools to find your work. To make sure you get credit for all the work you do, please take care in configuring Git on all the machines you code on.
To check that Git is configured correctly on your machine, look at the Author and Committer information in the Git Staging view. If these show your correct name and (most importantly) your University e-mail (ending in the domain student.manchester.ac.uk, with no brackets or quotation marks) then everything is okay. If they do not, then you will need to exit Eclipse and reconfigure Git using the information on the Department wiki:
When you re-enter Eclipse, the correct author and committer details should be shown.
⚠️ Caution ⚠️ If your name and e-mail are not shown correctly in the Author and Committer fields, you may be tempted to edit them directly in Eclipse, rather than fixing your Git configuration. That will fix the problem as far as this one commit is concerned, but you’ll need to remember to make the same change for every commit you make for this course unit.
This is a particular problem for the team-based coursework, where the only way our marking systems know if you have made any commits is if we can find ones linked with your GitLab account. GitLab uses the author e-mail address of commits to link them to the account with the same e-mail address. Students with no commits linked to their GitLab account for each exercise will automatically receive a mark of 0. Therefore, it’s really important that you take the time now to configure your local Git installation correctly now, to avoid losing marks in the future.
Now you can press the Commit button. Important: do not push your commit at this time. Just make the commit.
Why are we asking you not to push the commit at this stage? It is a good idea, especially when new to Git, to commit all your changes locally first, so you can check them out before you push them to the remote Git repository. In general, it is easy to fix Git errors in your own local repository. But it is much harder to fix problems once they have been pushed to a public or team repository, and pulled into your team mates’ local repositories. Getting into the habit of checking your commits before pushing them can save you a lot of time, frustration and embarrassment in the future, as well as sparing your team mates from losing marks due to your error.
So, before we do anything else, we’re going to check that the commit went through as we expected. This is quick and easy to do using the Git History view. To bring this up, right click on the project name in the Package Explorer, and select Team > Show in History. You should see a new view appear next to the Staging view. It’s a bit small, so figure 16.12 shows the effect of double-clicking on the view tab, to make it fill the screen.
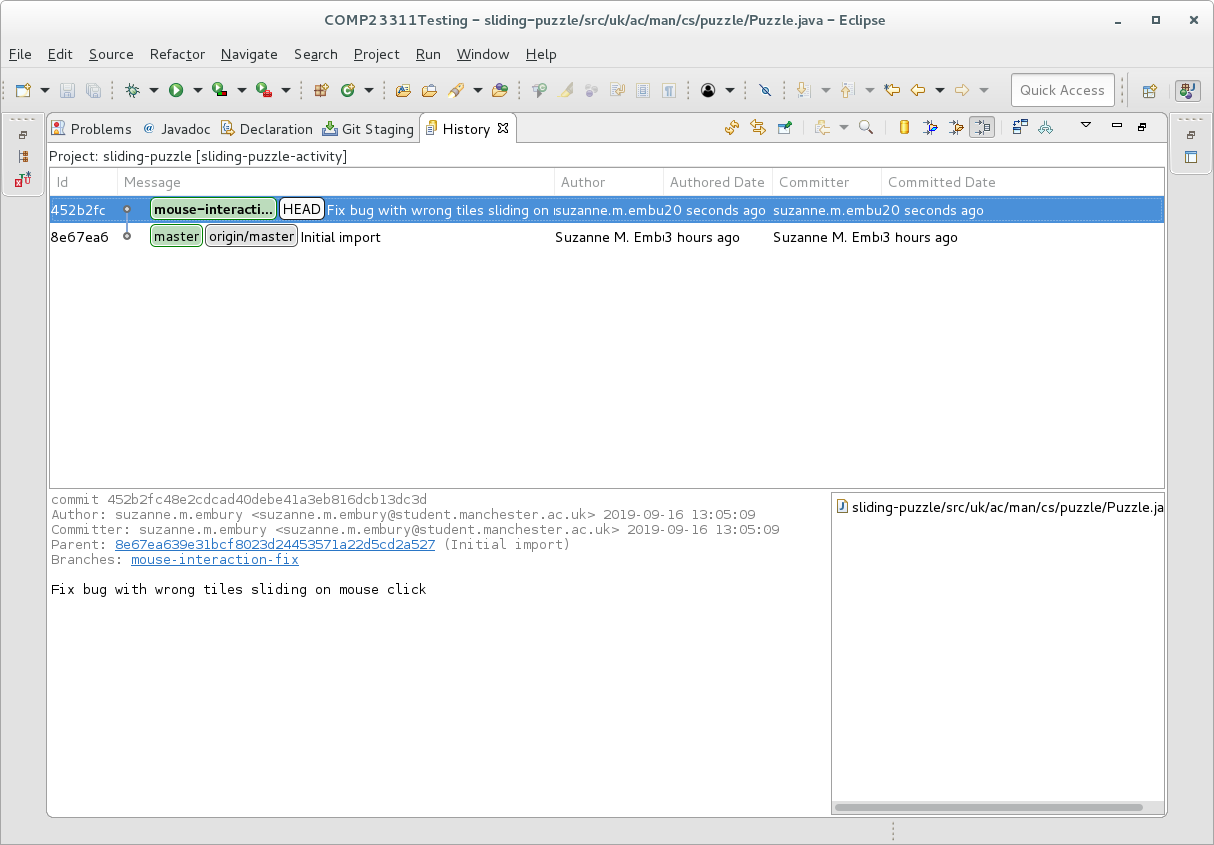
Figure 16.12: check commit in history view
This view shows the history of commits that are visible from the currently checked out commit. It shows that the branch we are on is one commit ahead of the local master, as well as the master branch in the remote repository (called origin/master because origin is the default name for the remote repository). The history view also tells us which branch is currently checked out, by bolding the name of the branch (and also putting the label HEAD next to it).
This looks okay, so we will go ahead and push the changes to the remote. Before doing this, take a look at the network for your remote repository on GitLab shown in figure 16.13
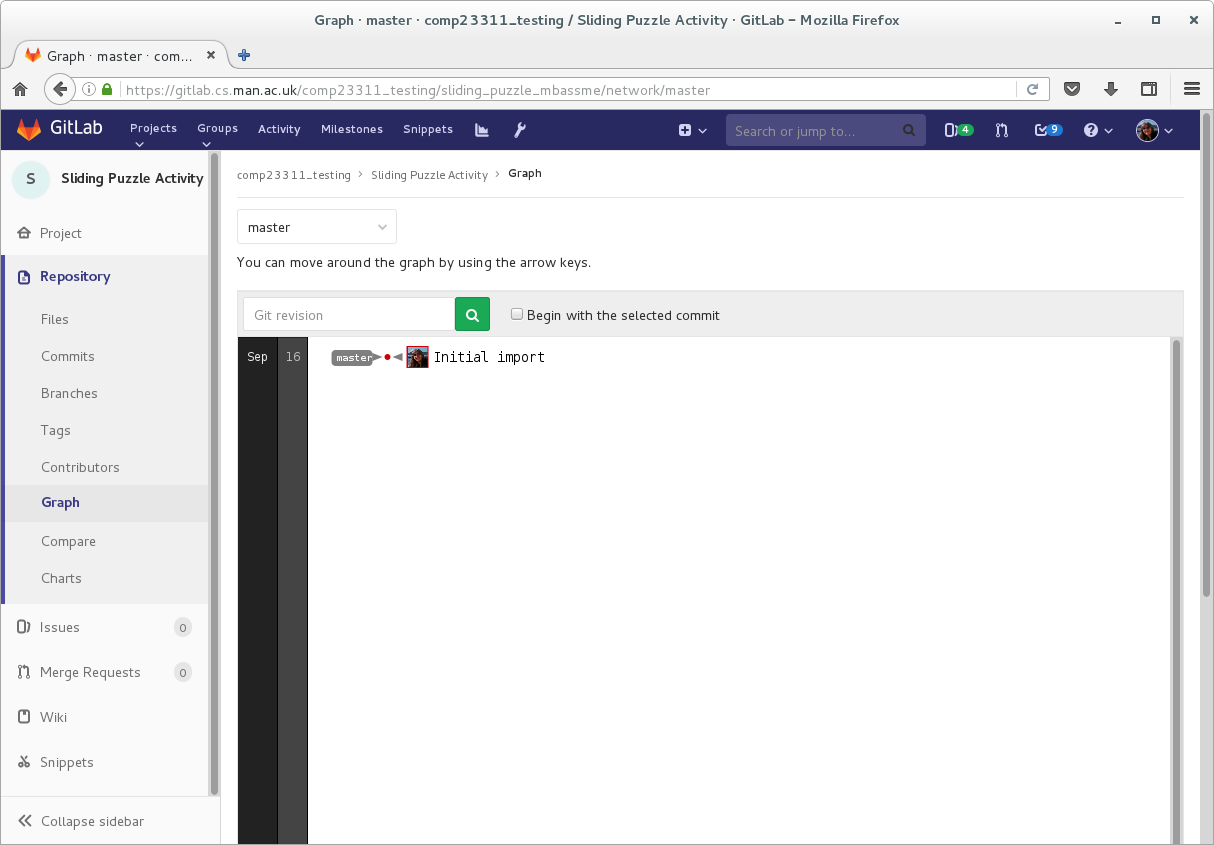
Figure 16.13: Screenshot showing gitlab before pushing
You should see only the master branch and the original lone commit. The changes you have made in your local repository are, as yet, not present in your remote (and therefore not visible to any collaborators you may have on the project).
Now push the changes, by right clicking on the project name, and selecting Team > Push to origin from the menu that appears. If this is not available, then you may also do Team > Remote > Push , then ensure the details are correct on the dialogue box, and then click Next. Whenever you perform remote operations, like push, Eclipse will need your GitLab credentials. If you didn’t save them earlier, you’ll be asked to provide them again at this point.
At this point, you may be asked to configure your repository for pushing. This sounds complicated but in fact is simple. Git is just asking you to tell it how it can map local branches to remote branches. Click on Advanced. You should see the dialogue appear in figure 16.14
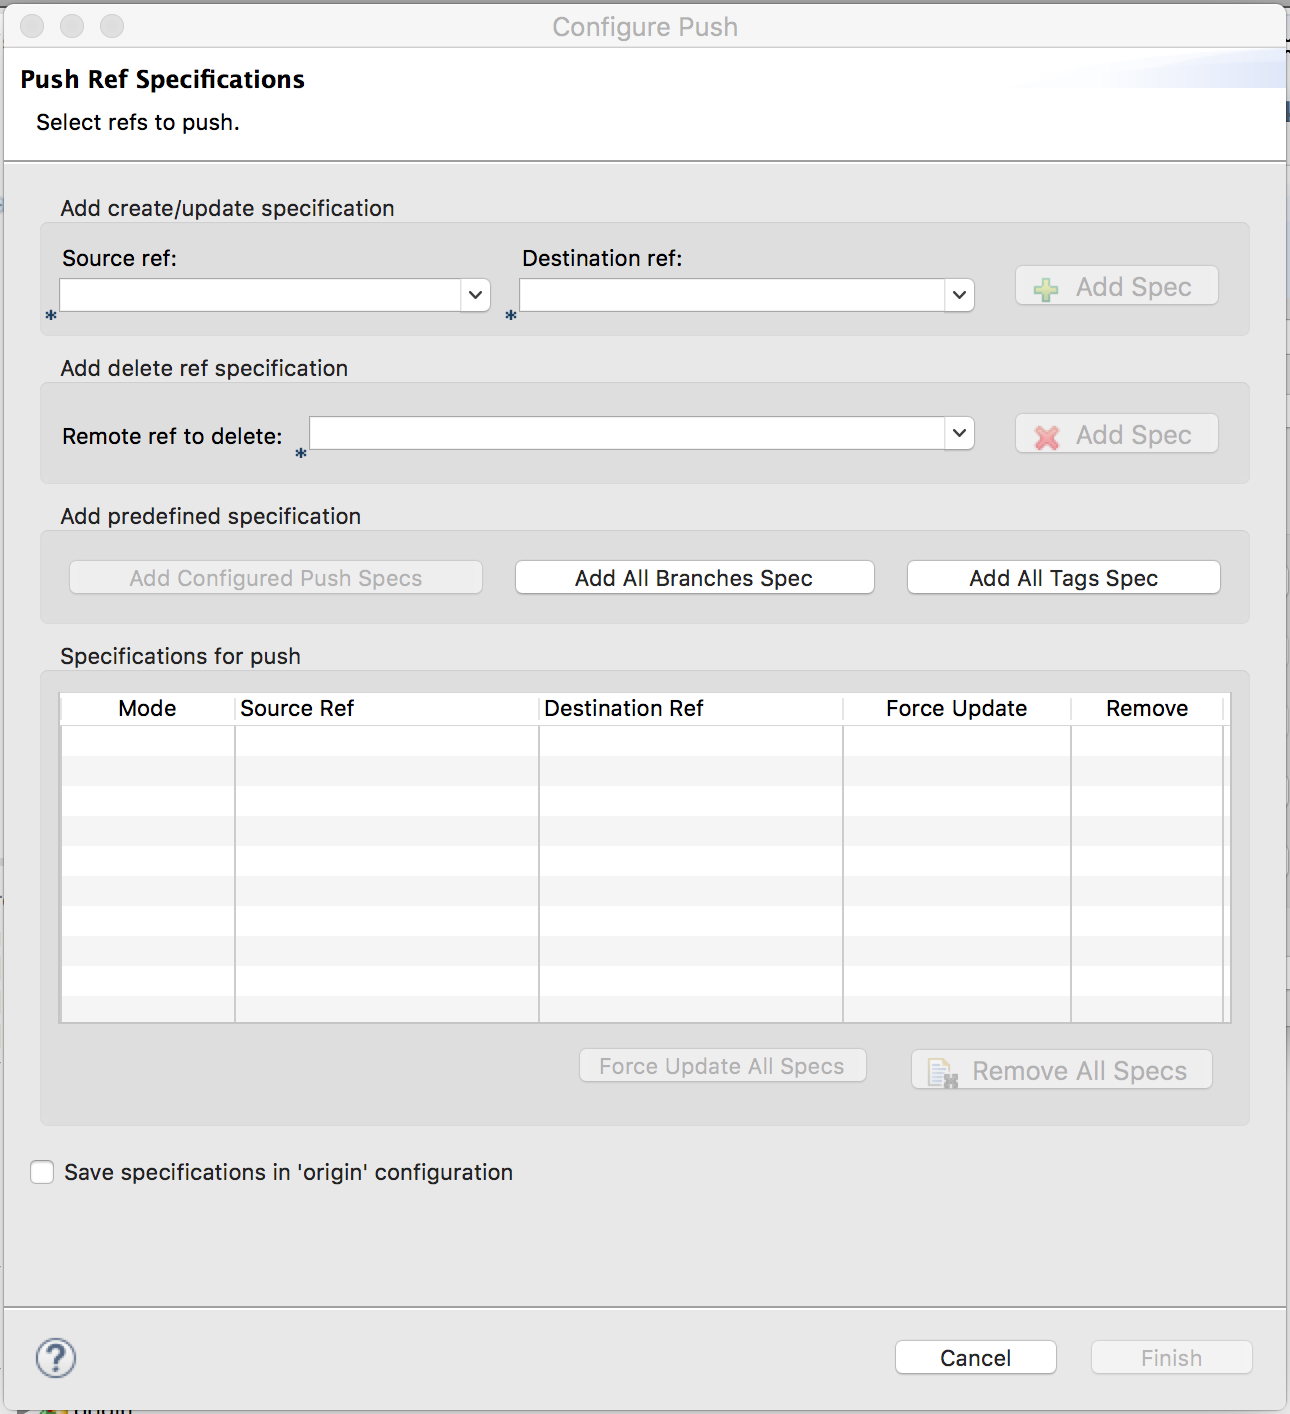
Figure 16.14: Configure push dialog
Press the “Add All Branches Spec button in the middle of this dialogue. This will add the default ref specs (reference specifications) to your repository. Select “Finish”. Your repository should now be configured for push.
Before it asks Git to push, Eclipse will give you a summary of what the push will do and ask you to confirm that you want to go ahead, looking something like the dialogue shown in figure 16.15
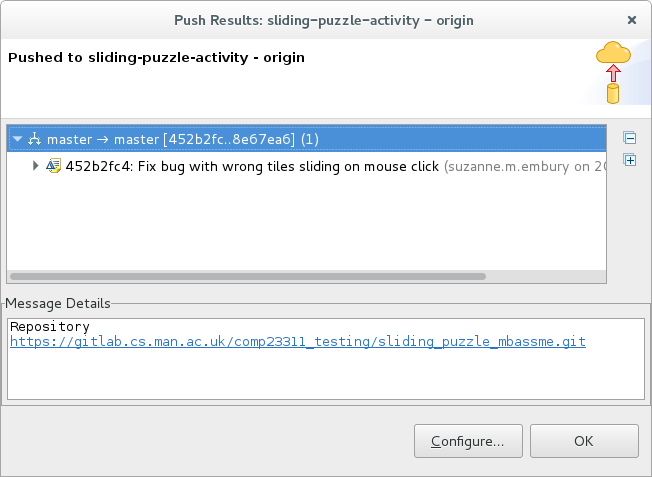
Figure 16.15: Confirmation of push to remote dialog
Press OK to initiate the push.
When the push is successfully completed, look at the contents of the History View. Can you see what has changed, as a result of the push?
You should also look at the commit graph in your remote repository. How has that changed since we looked at it before the push operation?
ℹ️ Note ℹ️
As a rule of thumb, you should only commit working code. This means: code that compiles and passes the tests. It is especially embarrassing to push code with compile errors to your team’s repository. Remember to check before you push!
16.3.6 Step six: Merge your Changes
In the Git workflow we use for this exercise, the development branch is called master.
Once a change to the code base has been tried out in a feature branch (and passes the tests), we can incorporate it into the main development branch, so that (when pushed) other team members can see it and build on top of it.
This is called merging.
In this case, we want to merge the changes in our feature branch into our master branch. The Git merge commands works by bringing the changes into the currently checked out branch. So we need to start by checking out master.
You can switch branches very easily from the History view. Just right click on the commit you want to check out (the one labelled with the master branch in our case), and select Checkout.
Eclipse will notice that there are two branches at the commit you want to check out. It will ask you which one you want to check out. In our case, that will be the local version of the master branch and not origin/master, the branch that is tracking the contents of the master branch on the GitLab remote. (Broadly speaking, you should never check out a remote-tracking branch.)
Select the local branch (refs/heads/master) and click OK.
When the checkout completes, the contents of the History view will change. It will look now as if the commit on the mouse-interaction-fix branch has been deleted, along with the branch it was on. Don’t worry—the commit is still there. By default, the History View shows only commits reachable from the checked out branch, which is now master—a parent of the commit we just made. Note also that master is now shown in bold text, and the HEAD label has also moved to this commit: both signs that this is the checked out commit.
Now we can go ahead and make the merge. Merging is a tricky part of Git, and it is easy to make mistakes. We’re going to do the merge in our local repository first, without pushing any of the commits, so we can check out the result and fix things before anyone else in our team pulls our mistakes into their local repository. This is a really good habit to get into.
To request the merge, right click on the project name in the Package Explorer, and choose the Team > Merge... option. (If you expanded the History View, as we did, you’ll need to double-click on its tab to get back to the normal Eclipse view layout before doing this.)
This will bring up a dialogue box giving you a choice of branches to merge with shown in figure 16.16

Figure 16.16: Request theM merge into master and select branch to merge in dialog
Select the feature branch we have been working on. Leave the other options with their default settings and click on Merge.
ℹ️ Note ℹ️ When learning Git, it can be tricky to remember which branch merges into which, when using the merge command.
The key thing to remember is that, unless you’ve said otherwise, Git will make changes to the checked out branch. When merging, start by checking out the branch that does not yet have the new changes in it. The branch specified in the merge command is the branch that contains the changes we want to pull in to the checked out branch.
After the merge is complete, the checked out branch will change, but the branch given in the merge command will be unaffected by the merge.
Remember: try your merges out locally and check them before pushing them. It is easy to fix merge problems locally, by using the Git reset command. Merge errors that have been pushed to a remote repository are much harder to correct.
When the merge is finished, Eclipse will show a summary of the results shown in figure 16.17.
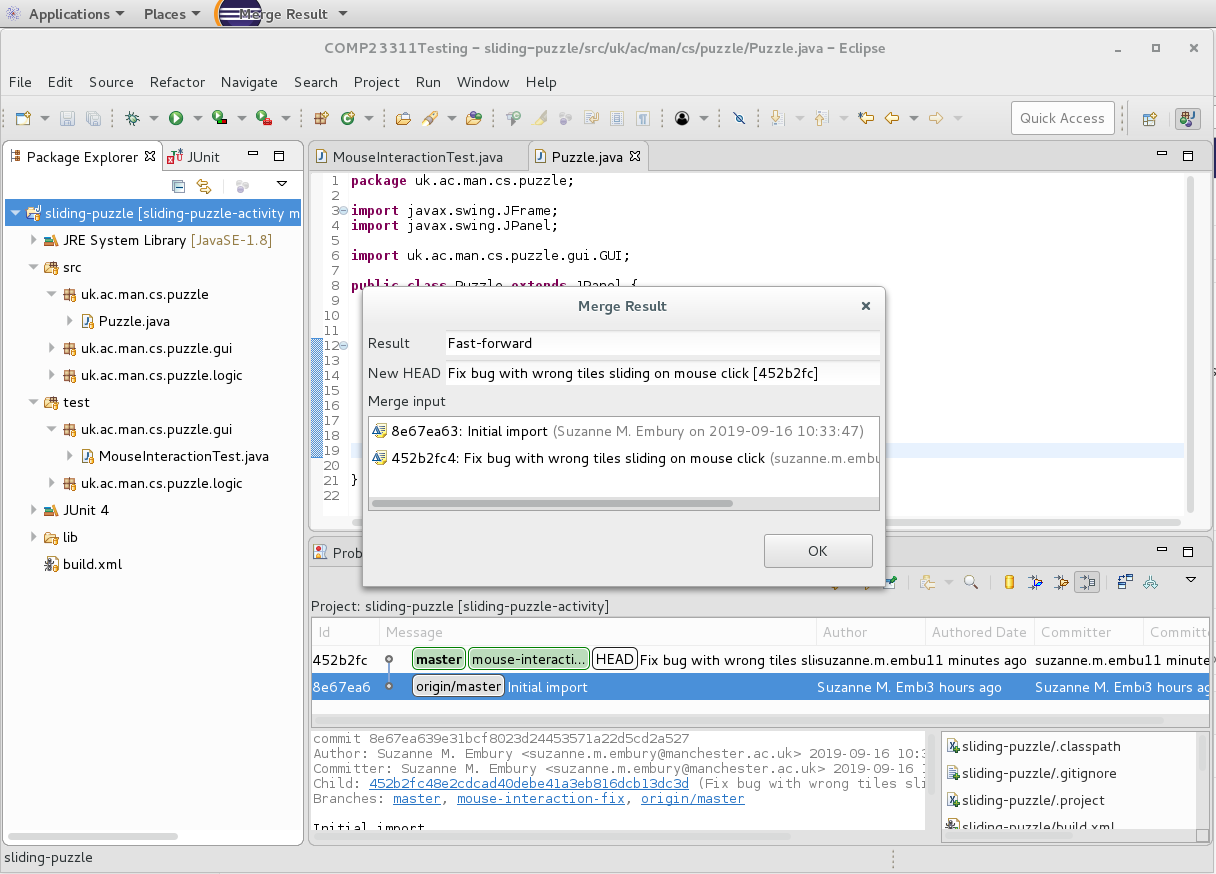
Figure 16.17: Screenshot showing merge results
In this case, the merge was successful. Git had only to perform a *fast forward merge8. That is, it just had to push the master branch forward by one commit to bring in all the changes made in the mouse-interaction-fix branch. It did not need to create a merge commit, and there are no merge conflicts to resolve.
The next step is to check that the tests still pass in the merged code. This is not so important after a fast-forward merge, if you have checked that the tests pass on the feature branch before merging. But merging is not always straightforward, and it is good to get into the habit of checking that tests pass after merging as well as before.
The History View (visible in the above screenshot) shows the new Git network after the merge. Now master and mouse-interaction-fix are at the same commit, with master still checked out. The remote tracking branch for the master branch in your remote repository, however, is still at the commit it was at when we first imported. This will change once we push the changes to the remote repository.
16.3.7 Step seven: Push the Changes to the Remote Repository
If the merge looks okay in your History view, and the tests all still pass, we can push the changes to the remote repository.
As before, we do this by right clicking on the project name, and selecting Team > Push to origin from the menu that appears. Again, if you haven’t saved your GitLab credentials in Eclipse, you’ll need to supply them again for this operation to complete.
Press OK to initiate the push.
When the push is successfully completed, look at the contents of the History View. Can you see what has changed, as a result of this second push?
If you have merged and pushed correctly, you should see both branches pointing to the same commit on GitLab as shown in figure 16.18
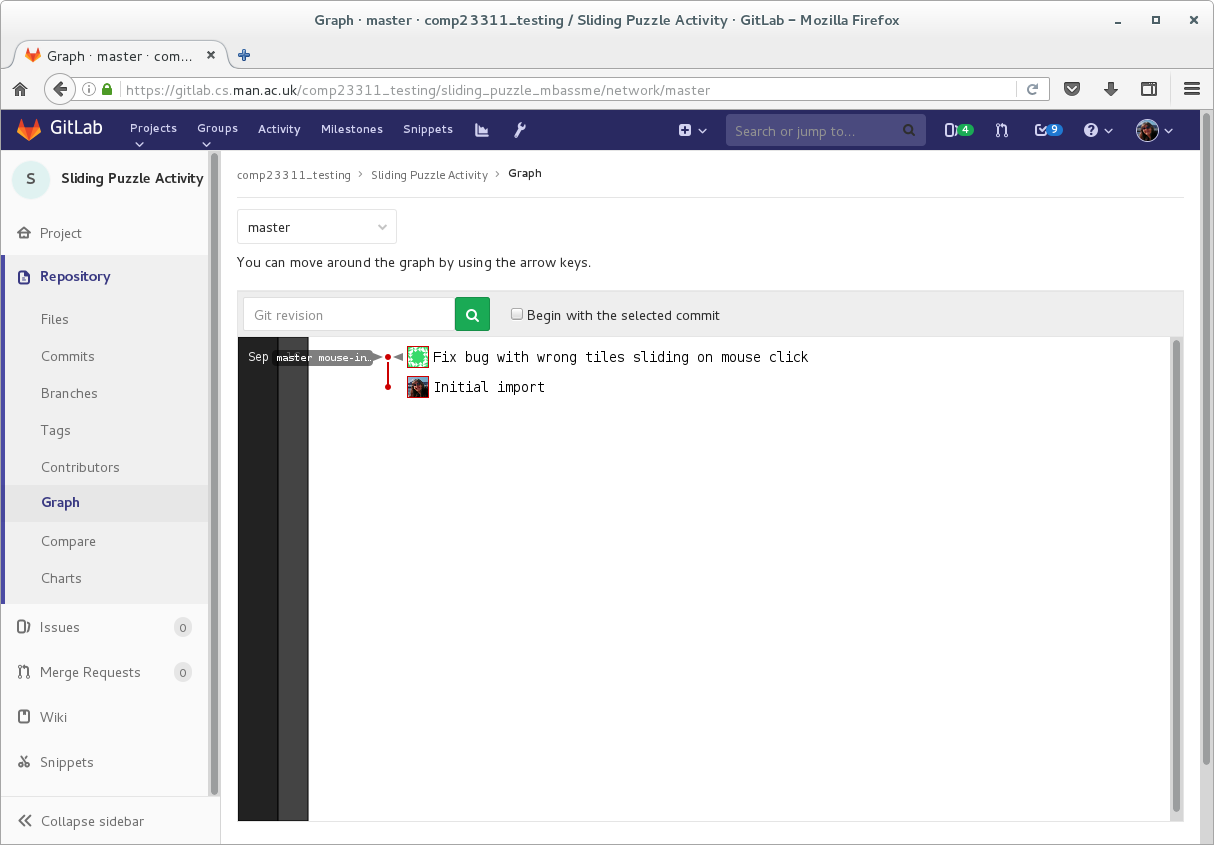
Figure 16.18: Screenshot showing check gitlab network after feature branch is pushed
16.3.8 Step 8: Record the Project Status in the Issue Tracker
Once the bug fix has been merged into the development branch, and the tests all still pass, we can close the issue. Open the Wrong Tiles Sliding issue in the issue tracker and click on the Close issue button. (Of course, if the feature branch hasn’t been merged into the development branch and the tests still fail, then we can’t close the issue, as the bug wouldn’t be properly fixed yet.)
When you are ready for your work to be marked, add a comment to the issue, to let the automated marking system know. The comment should contain the following text:
This comment will be detected by the automated marking code, and your work will be scheduled for marking at the next automated marking point. Because of this, it’s important that you use this exact text string in your issue comment. You can delete and re-add the comment at any time before the coursework deadline, if you want to make further changes. It’s also important that you add the comment to the correct issue. In the past, students have created new issues for this marking-request comment and even, in a few cases, have made dummy commits with this string as the commit message. None of these actions will be picked up by the automated marking system, so it’s important to check that the comment is appearing on the issue we created for you and that all your changes are visible at your remote before the deadline.
⚠️ Caution ⚠️ It is your responsibility to check that your work has been successfully pushed to the GitLab project repository before the deadline for coursework submission. We will not mark your local repository contents, only the contents of your GitLab repository. Therefore, make sure you check that the full set of commits and branches you expect to see are visible in your GitLab repository, and report any problems to the course team before the deadline.
If you submit your work late for whatever reason, add this comment to your issue to let us know that you are ready for the work to be marked. Late marking will be rerun every couple of weeks, so you won’t receive feedback immediately.
16.3.9 Messed Up?
If you make a mistake with the coursework, you can request a reset from staff. To do this, post the following line on the coursework issue in the issue tracker:
Every few days, while the coursework is active, we will run an automated process that will detect this request and reset the repository to the state it was at the start of the coursework.
Obviously, you’ll then lose access to any commits you made for the coursework so far, so use this mechanism with care. If you decide you have made the reset request by mistake, you can avoid the reset by deleting the reset request comment on your issue before the reset code is next run.
Note that you can only request one reset for this coursework exercise, so use it wisely.
16.3.10 Coursework Complete
This completes the instructions for the first individual coursework exercise for COMP23311. If you managed to complete it in full, then you can be confident that your Git/GitLab set up is as needed on this machine for the workshops and the coursework. Perhaps even more importantly, you have gone through the basic cycle of steps we’ll expect you to follow when carrying out the team coursework for this unit. If you were unfamiliar with this approach to coding, then it might have felt long-winded and complicated. But with a little practice, this pattern of work will become easier and more natural. And, with this experience under your belt, you’ll find it much easier to adapt to variants of it, if you join a software engineering team on placement or in employment outside University.
In the next individual coursework, we’ll look at a more complicated merge case, when Git can’t handle the merge by itself and needs help from you to intervene.