19 Team Coursework 2
Working with Features
19.1 Overview
In this second exercise using the Stendhal code base, you and your team are again presented with a number of issues recorded in your GitLab issue tracker. This time, however, the issues describe new features rather than bugs. That is, they describe extensions to the Stendhal game, rather than corrections to the implementation that bring it back into line with the way the game’s owners believe it should behave.
This brings into play a number of new software engineering skills. The first difference is the amount of work to be done. Unlike the simple bugs we looked at in the last coursework exercise, the features your team has been presented with are larger in size, involving the modification of existing classes and the design of new classes. Taken as a whole, they represent more work than you can sensibly achieve in the time given for the coursework.
You must therefore choose a subset of the issues that your team will commit to deliver by the deadline.
Another difference is in the scope of the work. Most bug fixes will be implemented in full, with few decisions to be made about how much of the work described by the issue it is worthwhile to complete. When adding new features the situation is more complicated: the full implementation may require a great many code changes, all of which may put other parts of the system’s behaviour at risk. In addition, it may not be clear how users will react to the new functionality, or what variants of it they may prefer to use. It is therefore usual to introduce new features gradually, over the course of a series of releases, to manage the risks and to adjust the direction of travel in the light of user reactions to the new functionality.
You must therefore create a release plan for each issue, showing how it will be released incrementally into the game. You will then implement only the first release of the full feature for this coursework.
This exercise will follow the same broad phases as the first team coursework exercise, but with several additional steps being added:
- Release planning.
- More detailed planning for the features selected for inclusion in the release.
- Testing and implementation.
- Code review.
- Integration and system testing.
- Making a new release.
- Preparing a video presentation demoing your new features.
You can choose how you carry out these steps in your team, perhaps combining or overlapping some of the steps.
The exercise will test your ability to:
- use basic software estimation techniques to commit to a workload that your team can deliver, and to divide work fairly across the team,
- scope features to control the risk of adding new functionality to an existing development,
- make use of a simple Git workflow for coordinating team development,
- write test suites that maintain test coverage across new and existing code,
- use code reading techniques to locate the parts of a large software system where new functionality can be safely added,
- use basic code review techniques to help ensure the quality of your team’s code, and
- use test-first development and good OO design principles to guard against regression in this and future releases.
19.2 What You Have to Do
19.2.1 Step 1: Release Planning
Your first task is to create a release plan for each of the issues in your issue tracker associated with the milestone for this coursework exercise. We showed you how to do this in the workshop in week 5 the course unit.
The release plan for each issue will describe a sequence of incremental releases that, when complete, will fully implement the feature in the game. This is done by dividing the work required for the full issue into sub-features, which can be delivered independently of each other. For example, if an issue requires the addition of a new quest to the game, with a brand new item type as a reward, then we might plan to release the item first in one release, and only release the quest in the next release, once we had had some time to try out the new item in real game play.
For each release, you must describe:
- The sub-features that will be delivered in the release.
- The target audience for the release (which group of users the new functionality will be released to) and how you will limit the feature to just those users.
- The existing game elements that can potentially be used to support some aspects of the sub-features to be delivered, and how they will need to be adapted.
The releases must be numbered and presented in the order in which they should be delivered. This order should take into account dependencies between the sub-features. For example, the release containing our new quest should come after the release that delivers the new reward item (for obvious reasons - we can’t release the quest if the reward item does not yet exist in the game).
Releases should be designed so that each one delivers a “playable” feature, that can be tested in live play. You also need to consider the effects on players of the game as they experience the different stages of release of the feature, and make sure that the overall sequence of releases makes for a sensible and pleasant game experience. Players are normally happy to receive additional game features, more capabilities, better items, as releases progress, but are typically less happy for the game to be made more awkward or annoying than in a previous release, or to lose useful capabilities they had in previous releases. So, for example, a good release plan would not first release a feature to all players and then in a later release restrict its use to only high level players.
The first release should be designed to be a “canary release” (also sometimes called a “feature rollout”). That is, it should aim to test that the most risky part of the feature is both technically feasible and provides a sensible and enjoyable game play experience. Therefore, for each first release, you must also give a short rationale for why you chose this part of the full feature to implement and deploy into the game first. (Only 3-4 sentences of rationale are required.)
You should think carefully about the target audience for each release, as discussed in the week 5 workshops. You also need to think about how you will organise the release so that the new feature is visible only to the target players and no others. For example, if you decide to open a new shop in Ados City, with the canary release being the new shop building, it will be hard to limit access to the new feature (the shop) to only certain players, because any player who walks past will be able to see it.
You need to make a release plan for all the issues, though at this stage they can be quite high level and short. The aim is to do just enough planning to allow you to make an informed decision about which of the features your team can commit to deliver for the coursework release.
You will document your release plans by placing them in the wiki of your team’s GitLab project. You should create a page in the wiki for each issue, using the page slugs shown on Blackboard (under Assessment & Feedback > Team Coursework > Team Coursework Exercise 2). For example, for team S1Team107, if the page slug for one issue is given as slow-innkeeper, then the wiki page for this issue would be reached at the following URL:
gitlab.cs.man.ac.uk/comp23311_2023/stendhal_S1Team107/-/wikis/slow-innkeeper
Use of the page slugs we provide means we can add links to your release plans for GTAs to use when marking. It is your responsibility to ensure that the pages are created using the correct page slugs, and GTAs will be within their rights to award 0 marks for release plans that they cannot find because they are located incorrectly on the team wiki.
Please use the following text for the header for this section of the wiki page, so that we can generate links to your WBSs in our instructions to GTAs for marking:
## Release Plan19.2.3 Step2.1: Choosing What you will Commit to Deliver
In most of the coursework you have been set for your degree, you are told exactly what you need to deliver and the work is set so as to be guaranteed to be achievable in the timescales allowed. Real software engineering is not like this. There is always more to be implemented than can realistically be achieved in the time available and it is not clear which parts of the functionality will turn out to be most valuable when released. Making decisions about what is most useful to build first, and how much to commit yourself and your team to deliver, is an essential part of software engineering. This coursework gives you the opportunity to practice and reflect on this skill, before you have to apply it in real life.
To allow this, we have given you a selection of issues describing new features for this coursework that, if implemented in full, constitute more work than you can reasonably achieve in the time available. You must choose a subset of issues to implement, balancing the need to do enough work to achieve your target mark for the exercise with the amount of time it is possible and worthwhile to devote to the exercise.
Each feature you implement is worth 12 marks if implemented perfectly against the criteria in the marking scheme. However, we have set a cap on the number of marks you can achieve for the implementation of features. This means that if you select too many features to implement, you will be wasting your time, as you will not be able to achieve more marks for the additional work done. Your aim is not to work long hours in order to achieve more than is needed, but instead to think about how you can use your time effectively, to deliver the expected amount of value in the fewest person hours.
Since this is a somewhat unsual approach to coursework, we have provided a spreadsheet that will help you in making your choice of features to implement. The spreadsheet will allow you to see the effects of your choices on the mark you will achieve, based on your predictions for the mark you’ll be awarded for each individual component of the work. The link to the spreadsheet can be found on Blackboard (under Assessment & Feedback > Team Coursework > Team Coursework Exercise 2). You’ll need to log in to your university Office 365 account to access it.
Once you have decided which features you will not be delivering in this release, you should remove them from the Coursework 2 Milestone. Only the issues you are committing to deliver should be associated with this milestone by the deadline for the exercise. RoboTA will mark the set of issues associated with the coursework milestone, so it is in your interests to make sure this is accurate before your coursework is marked.
Remember when selecting issues that you will only need to implement the first of the releases in your release plan for each selected issue.
19.2.4 Step2.2: Creating a Work Breakdown Structure for the Selected Issues
For each selected issue, you should create a work-breakdown structure (WBS) to come up with a defensible estimate for the effort needed to implement the first release. The work breakdown structure should be documented on the wiki page for the issue (in addition to and below the release plan for the issue). WBSs for this stage should contain more detail than for the high level release plans created in the previous stage. The level of granularity you should aim for is described in the RoboTA marking scheme for the exercise.
Please use the following text for the header for this section of the wiki page, so that we can generate links to your WBSs in our instructions to GTAs for marking:
## Work Breakdown Structure19.2.5 Step 2.3: Planning for the Implementation
You must next decide:
- which team member will be the lead for each selected issue,
- which team members will work on the implementation of each selected issue, and
- which team members will act as code reviewers for each selected issue.
All these decisions should be documented in your issue tracker, as described below.
Since the features we have set are more substantial coding tasks than the bugs you fixed in the first exercise, you will need to work together, in groups of 2 or 3, to implement some of the selected features. That is, you will break your team down into sub-teams, each of which will be responsible for delivery of the first release for an individual feature. Such teams are sometimes called “feature teams”.
A common cause of failure in team work is when all members of the team assume that some crucial task will be done by someone else. To avoid this, it is important to assign a lead member for each sub-team. This person is responsible for the detailed planning for their issue, for scoping it down, for coordinating the implementation work amongst the members of the sub-team, and for documenting the work as needed for marking. This does not mean that the team leader does all these tasks alone—it means only that the team lead is the person who will check that these tasks are all done and that everyone is clear about what they need to do and by when. Apart from that, the way the tasks are shared amongst the sub-team members is up to you. But it is expected that all sub-team members, including the leader, will do some coding for their issue, to allow them to meet the requirement that at least one meaningful commit be made for the coursework by every team member.
Team leads should be assigned as the responsible person for the issue in the issue tracker.
All other sub-team members for each issue must be recorded on the issue tracker, using a sentence of the form:
Sub-team member: <URL of GitLab profile of team member>
GitLab profile links have the form: https://gitlab.cs.man.ac.uk/name or @name, where name is a GitLab username. Multiple sub-team members may be recorded in separate comments, or in a single comment with newlines between the sentences. You do not need to record the team lead as a sub-team member.
Note that to receive marks for the coursework, every team member must be assigned to a sub-team for the exercise, either as lead or as a sub-team member, and must make a meaningful commit contributing towards the implementation of the feature their sub-team is assigned to implement. Work allocation must be designed to ensure that all team members are able to meet the criteria for receiving marks.
A further assignment of roles must be completed at this stage before you can proceed to the implementation of the issue. For this coursework, we ask you to apply the practice of reviewing all code before it is integrated into the main line of development for your team. Therefore, you should also decide who will carry out code review for each issue. Every member of your team must carry out some code review, and the code for every feature must be reviewed before integration. While you are welcome to carry out buddy reviews within sub-teams, the pre-integration code review step must be carried out by someone from another sub-team.
Code reviewers for issues must be recorded on the issue tracker, using a sentence of the form:
Code review by: <link to GitLab profile of team member>
Multiple code reviewers may be recorded for a given issue, if wished.
You should document your estimate for the effort required to implement each feature in the issue tracker. For this exercise, we are going to use GitLab’s Time Tracking facility. Information about how to do this can be found at:
https://docs.gitlab.com/ee/user/project/time_tracking.html
The results of your planning must be documented in the issue tracker and on the wiki before you begin work on each selected issue. We count the start of work on an issue as the commit date of the first commit made by the team that your GTA annotates as being part of the solution or test code for that issue.
19.2.6 Step 3: Testing and Implementation
Once issues have been allocated a team lead, feature teams can start work on the implementation of their features. The team lead should begin by expanding the WBS for the work on the issue’s wiki page (if necessary), and by allocating parts of the work to the sub-team members. Care should be taken to find a breakdown of the work that allows sub-team members to work in parallel on different parts of the feature and to meet the criteria to receive marks for the exercise.
The team lead should set a due date for the delivery of the feature to the team, using the issue tracker’s Due Date facility. Obviously, this due date should be chosen to allow time for code review, corrections and merging of the feature into the development branch, plus making corrections in the event that this breaks the build. The due date must be set before work on the issue begins (considered to be the time when the first commit for the implementation is made).
The team lead should update the estimate for the issue in the issue tracker if, based on the more detailed planning carried out, the sub-team feel the original estimate was inaccurate.
We ask you to use the “feature branches with code review” Git workflow for this exercise. The main difference from the exercise 1 workflow is that you will use merge requests to ensure that all feature branch commits are reviewed and high quality before merging into the main line.
In addition, there are some further new skills we ask you to demonstrate in this second course unit. We are asking you to code in a test-first manner, to manage the quality of the commit messages your team makes, and to use a test coverage tool to assess whether you have written sufficient tests or not. Details of all these requirements are given below.
Choosing a Sensible Starting Commit
It is important that all the team start their feature branches from a clean commit. Otherwise, problems in commits for the 1st exercise (such as failing tests) will be carried forward into the new feature branches, and may result in lost marks for this exercise too. It is your reponsibility to ensure that this does not happen.
Teams with a clean build for their development branch in Jenkins should be okay to start the work for the next coursework exercise from the latest commit on main. Teams with unstable or failed builds on their development branch will need to start by getting the main branch to a clean state. You can do this by adding commits on main that fix the errors, or you can choose another commit in your code history to start from. A common choice for teams who have messed up their code quality severely in exercise 1 is to start this exercise at the EX1_START commit.
Once a suitable starting commit has been identified or created, one member of your team should create a tag pointing to that commit. The tag should be called:
EX2_START
We have created a Jenkins build for this tag, to help you choose a good starting point for your work for this exercise. Push the tag to your candidate starting commit and then manually trigger a build of the job, if Jenkins does not build it automatically.
If you place the tag at the wrong commit, and need to change it, you will need to delete it and recreate it. Instructions for deleting tags can be found at the end of this document.
It is expected that your development branch will start at this commit for exercise 2, so all team members need to make sure their main branch is located at this commit before starting to create feature branches for this exercise. You may need to request the help of the course team to achieve this, if your desired starting commit is behind the current commit on main.
All named feature branches for exercise 2 should begin at this tagged commit or a later commit on the development branch.
Git Workflow
As before, you should use feature branches to keep the work on each feature separate from the main development branch, until you are satisfied that the code is ready to be integrated into the main game code. Please continue to follow the Stendhal team’s practice of using the main branch as the development branch.
Please use the feature branch names given on Blackboard for this exercise. These branch names are expected by the automated marking system. Failure to use these exact names will mean that the marking system is unable to find and award marks for your work.
A change from the previous exercise is that you are likely to have more than one person working together for some issues, and therefore will have more than one person committing to your feature branch. You are free to create sub-branches off this, if individual team members want to work in isolation for part of the work. These sub-branches would then be merged into the feature branch before merging into the development mainline; they should not be merged directly into the main branch.
Best Practice Commit Messages
For this exercise, we ask you to gradually increase your Git skills by following best practice in terms of the commit messages you use. We ask you to adopt the style of commit message recommended by GitHub. Details of this format can be found on Blackboard under the Course Content for week 7 (“Git Workflows”).
An example of a commit message that follows the format we want you to use is:
```Allow Joshua to list ingredients for spy glass
When asked, Joshua will now list the ingredients he needs for making the new spy glass item. This was trickier than it looked, because Joshua was already using all the available conversation states. I added a new state (QUESTION_4) to make it work.```
Note the phrasing of the first line, as a sentence in the imperative that completes the sentence “When applied, this commit will…”.
For a full list of the rules to follow in writing commit messages in this form, see the resources under week 7.
⚠️ Caution ⚠️
Please make sure your commits have the correct author metadata, so that we can find and mark all the commits you make for the coursework. Your commit author email needs to be set to the primary e-mail address for your account on our GitLab server. For most students, this will be your firstname.lastname@student.manchester.ac.uk university address.
Check that your Git configuration is set correctly on all machines that you will carry out work for the coursework from. Check the instructions on using git config from the School wiki:
wiki.cs.manchester.ac.uk/index.php/Gitlab/Git_Setup
Commits made from other accounts may not be considered to be part of your team’s submission for the exercise.
Test-First Coding
As in exercise 1, you are asked to write tests to describe the behaviour of the code change you are making. For this exercise, we ask you to use the test-first development strategy introduced in week 5 of the course - or at least to make an attempt at it.
Each sub-team should begin by writing at least two failing acceptance tests for the feature you plan to implement, following the test-first approach demonstrated in the course. These tests should describe core elements of the features, not trivial side cases. For example, a test where a quest is undertaken and completed in the quickest way would be considered core, while a test where a quest is refused at first offer is not.
To help us assess and give feedback on your use of test-first development, we ask you to commit these two failing acceptance tests before you commit the production code implementation that will make them pass. You may make changes to these tests in later commits, as well (of course) as changes to production code. But the first commits on the feature branch should contain two tests that are sufficiently complete in their implementation to allow the code to compile and run to an unstable build. You should also commit any stub production code needed to allow the tests to compile.
(Note that it is not normal practice to enforce the committing of new tests to a feature branch, although of course when using a test-first approach this tends to be what happens naturally. We are taking a slightly stricter line on this than would be expected in practice, in order to help you demonstrate that you understand the principle of test-first coding and are able to apply it in practice.)
To tell us when you have committed the test code and are ready to start working on the production code, we ask you to mark the final test code commit with a special tag. The names of these tags are given on Blackboard, under Assessment & Feedback > Team Coursework > Team Coursework Exercise 2. Jenkins builds will be set up to build the commits marked by these tags, to allow you to check you have positioned them correctly and to aid us in marking. You should expect to see an unstable build on these tags, where the only failing tests are those that you have added in the first commits on the feature branch.
Management of Test Coverage
When writing tests for more extensive functionality changes, you may wonder when you have written enough tests and when you can stop. This is a critical question for software developers, since writing tests is not free (neither in terms of developer time, nor the time required to run the tests). For this coursework, we ask you to use test coverage to help you manage your tests, and determine whether you need to write more.
Since this is the first time that most of you have used a test coverage tool, we are setting a fairly low coverage goal for this exercise. We ask you to ensure that you maintain the overall instruction coverage level for the coursework set by the Stendhal team in the starting commit for the coursework.
We will mark your team’s coverage using the instruction coverage for all classes, given in the “Overall Coverage Summary” values on your team’s EX2_START build in Jenkins. RoboTA will extract this percentage in the marking details, so you can tell which coverage goal you have to beat, if you are unsure where to find it in the build coverage results.
If your team’s coverage is lower than this value, you will need to use the coverage reports to find areas of the new code you have written that is not well covered by tests. Looking at the instructions that were not executed during the test suite execution, you’ll need to think of extra tests to add that will cause those instructions to be executed. (Obviously, these tests will necessarily be added after the main work on the production code has been completed. This is fine, provided you have at least 2 core tests committed in the earliest commits on the branch.)
Documenting Your Work
You should use the issue tracker and the team wiki to document any problems you encounter that require you to make changes to your plan or your team structure. Discussion while implementing using other tools (such as Facebook or Slack) is obviously fine but remember that we can only mark what we can see. Key decisions regarding who does what work, and changes to the planned scope for features that are running late, must be documented on your GitLab issue tracker if we are to be able to take them into account when marking.
An important piece of documentation to keep is your estimate of how much time the feature will require to implement and the record of how long you have spent on the feature so far. You should record this in your team’s issue tracker on GitLab, using the “time tracking” feature, as you did in exercise 1. Information on how to use this is available from the side bar of each issue. Note that you will need to record all the time spent by all sub-team members. You will probably find it easier to update the time spent as you go along, rather than trying to remember and adding the total in at the end but either strategy is acceptable.
For this exercise, there is no need to record the times for the different tasks (writing tests, implementation, merging) though you may wish to do this for your own personal reference.
An additional documentation requirement that we ask you to follow in this coursework is the practice of linking the issue you are working on to each commit you make by mentioning it in the commit message. Information on cross-linking issues in this way is given at:
https://docs.gitlab.com/ee/user/project/issues/crosslinking_issues.html#from-linked-issues
(Note that we don’t ask you to link your feature branches to issues in this coursework as at present the Jenkins builds are not set up to recognise branches named using that convention.)
19.2.7 Step 4: Code Review
For this exercise, we ask you to start to make use of an additional code quality management technique: code reviews. Your goal is to ensure that no code is merged into the development branch without having an independent team member look over it and check for errors or code quality problems. You will lose marks if unreviewed code is merged into the development branch.
Both test code and production code changes must be reviewed, using the discussion feature of a merge request. A single merge request must be created per issue/feature, with more commits being added to the merge request to respond to the points raised by code reviewers. The merge request must be linked to the issue that it applies to.
Every issue selected for inclusion in the release must receive code review on its merge request and every contributing team member must perform at least one review for each issue for which they are listed as a designated code reviewer. To be counted as part of the coursework, code reviews must be entered into the GitLab merge request discussion facility. Reviews given verbally, or recorded in some tool other than GitLab, will receive no marks (for obvious reasons).
To count as a review, a comment on a merge request must make some substantive comment about a part of the code. Content-free pats on the head (“Looks good - great work”) will not count as code reviews. In addition, we make a special case for reviews which do no more than suggest an increase in the number of comments in a piece of code. As discussed in the workshops in week 9, additional comments are almost never the solution to a piece of code that is hard to read, and in most cases make the code worse rather than better. Because of this, reviews that only make a general request for more comments will not be considered as code reviews.
A guide to performing code review can be found in the course materials.
19.2.8 Step 5: Integrate Completed Features into the Development Branch
When you are satisfied that a feature branch contains code that is fit to be integrated into the game, you should merge the feature branch into the development branch. For this exercise, we ask that you use non-fast-forward merges for all merges of your feature branch into the development branch9.
To create a non-fast-forward merge in Eclipse, use the Team > Merge command from the project context menu, and select the option to create a merge commit in the event of a fast-forward merge shown in figure 19.1.
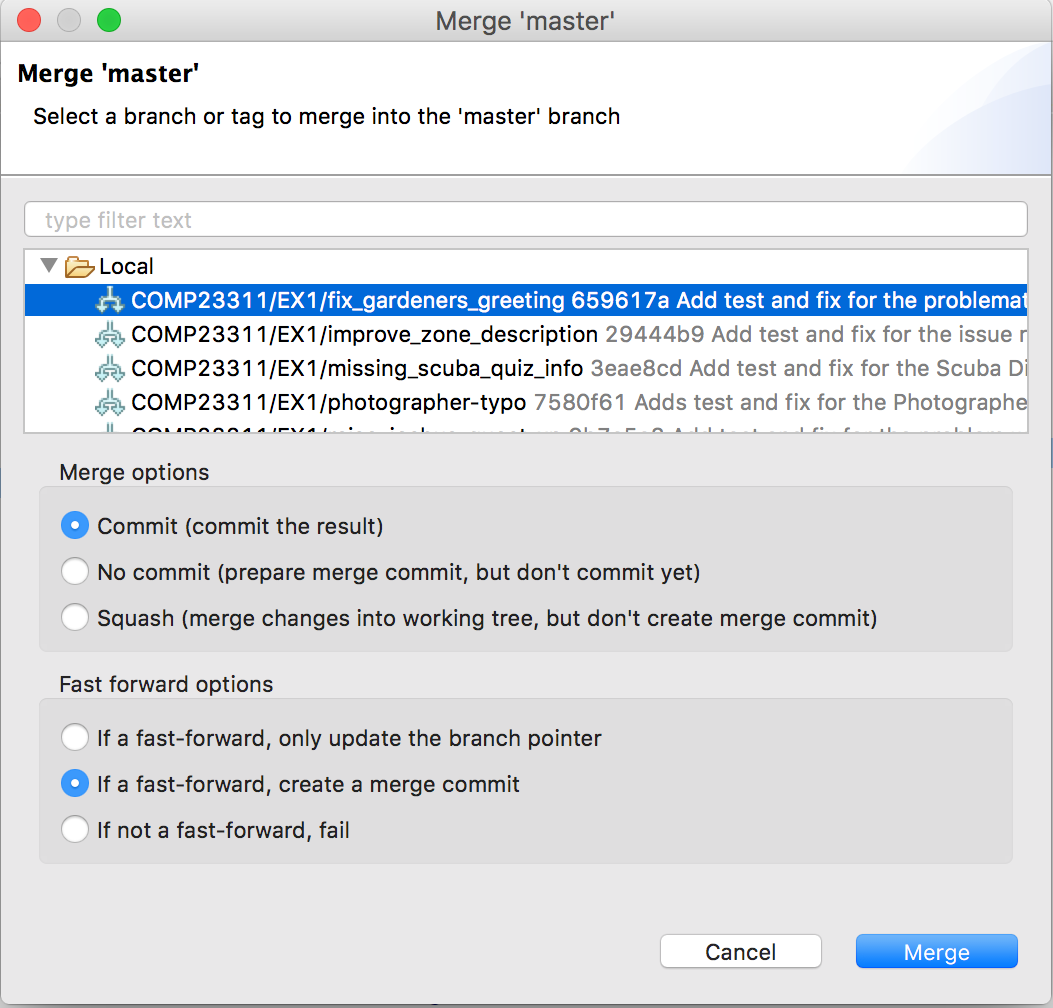
Figure 19.1: Non Fast Forward Merge Option in Eclipse
Unfortunately, the handy merge option accessible through the History View doesn’t give the chance to request this option, so should not be used for merges of your feature branch into the development branch. If you use this version of merge by mistake, don’t panic. Fast forward merges are easily undone just after you make them by resetting master to the commit it was at before the merge was made provided you have not pushed your merge to your team’s remote.
You should use merge requests for this coursework exercise, to provide a “quality gate” for code, to prevent it from being integrated into the development branch before it has undergone code review. Please continue to make merges locally, checking them in the History View before pushing the merge commit to your team’s remote, rather than using the “Merge” button on the merge requests. This allows you to verify that the commit builds cleanly and passes the tests before it is shared with your team. It also prevents you accidentally creating a wrong merge because you have not set up the merge request properly.
To help give you early warning of any merge problems, we have set up Jenkins jobs to merge your feature branches into the development branch on each commit—these builds are true “continuous integration” builds. The merges are carried out on Jenkins and are thrown away once the next build takes place. The merge will not be pushed back to your team’s repository, but you will be given clear information about whether it is a healthy commit or not.
We will assume that new issues will be created for the remaining releases for the features you select for implementation. Therefore, once your feature branch has been merged into the development branch, and the resulting commit produces a clean stable build, and you have observed the feature working in game, you can consider the issue to be closed and should update its status in the issue tracker. Don’t forget to add the time required to carry out the merge to the issue’s time tracker.
Issues for un-merged features should be left open, even if some commits have been made for them. The team needs to know that this feature’s canary release was not completed, so they can return to it in future should customer interest in the functionality proposed make the effort worthwhile.
19.2.9 Step 6: Prepare the Release
The final technical step is to prepare the release. Although several team members may contribute commits for this process, a single team member should take responsibility for making sure the release is created correctly. This team member should create an issue for this task called:
Prepare release 1.44uom
This issue should be associated with the coursework 2 milestone, and assigned to whichever team member is taking responsibility for carrying out the release task.
Choose the commit on the development branch which will form the basis for the release. This commit should include all the changes for the features that have been completed by the team during the coursework and have been merged successfully with the development branch. These are the issues that will be included in the release.
Once again, you will need to update:
- The version number of the software (in all places where it is mentioned in the code base) to 1.44uom
- The
doc/AUTHORS.txtfile - The description of the changes included in the release in the
doc/CHANGES.txtfile
You can make these changes directly on the development branch.
When you have created a commit that contains all the code and documentation you want to release, you should mark this by adding a tag at that commit. The tag must be called:
VERSION_01_RELEASE_44_UOM
This is the version of the code that we will consider to be your released code, when we are marking. So, it is important that you place it at the right place. You can create the tag locally and push it, or you can use the GitLab web interface to create the tag once the release commits have been pushed.
When you have made your release tag, you can contact the course team to request that it be protected against further changes.
19.2.10 Step 7: Prepare to Report Back on the Work Done
You are done with the technical work at this stage, but there is one more task to do: report back on the work you have done.
This reporting back will take two forms. You must prepare to demonstrate the features you have added to your customers. In real life, this demonstration would be done face-to-face, either in person or over some kind of conference call. But in this exercise, to keep the marking processes straightforward, we are asking you to create a video in which you demonstrate the new game version you have created. More details of the video format are given in the submission instructions below.
You will also take part in an in-person interview with the GTA who is assigned to mark your team’s work. The interview will take place during the team study sessions in weeks 11 and 12 of the semester. During this interview, the GTA may ask you to demonstrate again some parts of the features you have implemented (if, for example, some part of the feature was not clearly demonstrated in the video). The GTA will also ask you about some aspects of the processes you followed as you carried out the exercise.
At the end of the interview, you’ll be asked to reflect on your work as a team, looking back over how things went as well as drawing lessons for the next team software project you work on (whether professional or coursework based). Your team should prepare to answer the following questions in your interview:
- What went well for your team in this exercise?
- What could have been better?
- 3 key practical actions you will take forward into the team software engineering coursework in the next semester.
Note that all team members must attend the marking interview in person. A marking penalty of 50% of the team’s final mark will be applied to students who do not attend at the time scheduled for their team. Students who have good reasons for missing the interview will need to submit a Removal of Late Penalty request or a mitigating circumstances form, to request removal of the penalty.
19.3 Submission of Your Team’s Work
Apart from the demo video, all submission of work for this coursework exercise is through your team’s GitLab repository. All you have to do is make sure the contents of your issue tracker, wiki, commit comments and Git repository are ready to be marked by the deadline.
Once the deadline is passed, you will lose developer access to your repository and will no longer be able to push any commits or change any references. You will still have access to the issue tracker, but since all actions on the issue tracker are time-stamped, any changes you make after the deadline will be ignored for the purposes of marking the work.
Your demo video should be uploaded to Blackboard, with a file name that includes your team name. Only one member of the team should upload the video. We do not want to see multiple uploads of the same video on Blackboard.
The link for uploading can be found on Blackboard under Assessment & Feedback > Team Coursework > Team Coursework Exercise 2.
The video must follow the format given below:
- Each feature included in the final release must be demonstrated in the video, along with a narration from one or more members of the sub-team that implemented the feature. You do not need to repeat any information already given in the release plan, but should concentrate on demonstrating the functionality as actually implemented.
Note that anyone who narrates during the video must also record their face while speaking. Unlike the video in team coursework exercise 1, it is not necessary for every team member to speak or be visible in the video, although of course everyone who wants to take part in it must be allowed the chance to do so.
Your video must not exceed 15 minutes in length. In cases where a video is longer than this, the GTA marking your work will stop watching at the time limit and any content after this point will not be considered in assigning your mark.
To create your video, you might find the following software useful (these are only suggestions and shold not be taken as a requirement or endorsement to use them):
- OBS (For screen recording)
- Shotcut (For very basic video editing: there is a low barrier-of-entry here, when compared to other video editing software)
- Powerpoint / Libre Office Impress / Keynote (for creating slides)
- Zoom (for creating a video meeting and recording to allow all team members to speak)
19.4 Coursework Extensions
Since this coursework is a team exercise, no extensions will be given. Team members who experience substantial difficulties in completing their work due to illness or other legitimate reasons will need to complete a Mitigating Circumstances form so that this can be taken into account later. The marking process is sufficiently flexible to take into account non-contributing team members without significantly affecting the team mark. This means that no student should feel compelled to carry out more than their fair share of work to cover for a non-contributing team member.
If you are not going to be able to carry out the work for your issue by the deadline set for your team, you must inform the other team members in plenty of time. This will allow them to make decisions about what to include in the release, so they don’t lose time dealing with the fact that your work has not been done.
19.5 Non-Contributing Team Members
Every team member is expected to contribute some meaningful code to the team’s repository.
⚠️ Caution ⚠️
Any student who has not been assigned to a sub-team for an issue, whether as lead or as sub-team member, by the deadline for the coursework, will automatically received a mark of 0 for the whole exercise.
Any student who has not made at least one meaningful commit to their team repository, from their student account on our GitLab server, during the period covered by the exercise, will automatically receive a mark of 0 for the whole exercise. A meaningful commit is one that contributes code changes to either test or production code that moves the team’s repository closer to the fix for an issue in some way. Adding white space, rewording comments or moving lines about are all examples of code changes that will not be considered to represent a meaningful contribution to the exercise.
This applies even if you decide to work in pairs on the issues. Sitting and watching someone else make a commit, even if you are telling them what to type, does not count as a commit from you. The commit must be made and pushed from your own GitLab account.
Note that RoboTA will tell you whether you have met these criteria or not, so check your team’s RoboTA report frequently, and sufficiently in advance of the deadline to allow corrections to be made if either of the conditions to be considered contrubuting are not met.
19.6 Partially Contributing Team Members
If a team member contributes something, but does much less than others or contributes their work in a way that causes problems for the rest of the team, the team as a whole can request to reduce the mark of that student. For this to happen, you must:
- Send an e-mail to the student as soon as the problem is noticed, pointing out the difficulties they are causing for the team, and asking them to say what they can do to resolve matters. CC this e-mail to Suzanne, so we have a formal record of the communication. This e-mail must be sent before the coursework deadline, giving the recipient time to respond and take action before the team submission is complete.
- Set a deadline for the team’s work that is sufficiently far ahead of the actual deadline, so you have time to chase people who don’t deliver.
- Before the team marking interview, send an e-mail to Suzanne and the offending team member letting them know that the team will propose a reduced mark for them at the interview.
- At the interview, raise the issue with your GTA, who will document the circumstances on your marking form, along with details of the proposed mark reduction. The opinion of the affected team member will also be recorded, if they are present.
- If team agreement on the mark reduction cannot be reached, the whole team will need to meet with a member of the course team to agree a way forward.
Note that this process is not necessary for team members who have not made any commits in your team repository, as they will automatically receive a mark of 0 in this case.
Mark reductions apply to individual team members only. There is no effect on the mark of the rest of the team. Teams are asked to try to resolve problems within the team if possible, before requesting mark reductions, but this option is there as a measure of last resort for those teams who need it.
19.7 Messed up with your Git Repository?
Each team can request the following repository reset actions at most once for this coursework exercise, should they need help starting again.
- You can request that branch protection be removed from the
masterbranch for your repository. Note that themasterbranch will still be recorded as the default branch for the repository, so will still be subject to certain restrictions. - You can request that your
mainbranch be reset to the same commit as theEX2_STARTtag if pointing to. This will remove any merges of feature branches into the repository since the start of the exercise.
To request either or both of these options, please create an issue in your issue tracker called “Repository Reset Request”. The issue description must describe the request and must include a mention of Suzanne’s GitLab account @suzanne.m.embury (so she knows you have requested it).
Please note that the course team aim to respond to requests to reset your development branch or remove branch protection within 3 working days. You should not expect the change to happen immediately, and should factor a delay of this long into your planning. This also means that we will not accept any branch protection or reset requests after the end of the Wednesday team study session in the week of the deadline.
19.8 Plagiarism
This coursework is subject to the University’s policies on plagiarism. Details can be found on the School web pages at:
studentnet.cs.manchester.ac.uk/assessment/plagiarism.php?view=ug
Note that committing the work of other people from your GitLab account counts as plagiarism, and action will be taken when it is detected. Rebasing commits authored by others does not count as plagiarism, providing the original authorship information is retained in the commit metadata (but neither will such commits count as meaningful contributions for the person rebasing them).
19.9 Summary of Penalties
Throughout this document, several circumstances are mentioned where a penality will be applied to a student’s individual or a team’s mark. For ease of reference, the full set is summarised below:
| Description | Penalty | |
|---|---|---|
| Individual uses incorrect email address on all of their commits | Student receives mark of 0 | |
| Individual does not contribute a meaningful commit to project | Student receives mark of 0 | |
| Individual is not assigned to an issue as either the responsible person or a sub-team member | Student receives mark of 0 | |
| Individual does not attend the team marking interview | Student receives a 50% mark penalty |
19.10 Technical Appendix
19.10.1 Deleting a Tag on GitLab
If you need to move the position of a tag you have created in GitLab, you will need to first delete the tag (using the red dustbin icon on the Tags page) and to recreate it in the right place.
This is easy enough. However, as always when making changes to a team’s remote repository, there is a complication to be aware of. If other team members have the old tag in their local repository, you will need to make sure that the tag is updated to point at the right commit, before someone pushes the old location back to the repository again.
Therefore, as soon as the tag has been recreated in GitLab, all team members should run the following command, at the command line, from the folder where their local Stendhal Git repository is located:
% git fetch --tags
You can check that the tag now refers to the correct commit using the command:
% git rev-list -1 <tag name>
It is recommended that operations on your team repository, such as correcting the location of a tag, are done in a team study session, when all the team is present and able to carry out the necessary commands on their local repositories at the same time.